Archive for the ‘Work’ Category

Where Politically Correct Indoctrination Goes Wrong

Tuesday, June 9th, 2015

This woman, whoever she is, needs to be heard, because what she has to say about the military’s sexual harassment training is spot on.

Kayce M. Hagen is a pen name assumed by an active duty enlisted airman. She wrote the following words to capture her thoughts after attending mandatory annual training given by her base’s Sexual Assault Response Coordination (SARC) office. I’m publishing her letter here not just because it captures in visceral form a sentiment I’ve heard repeatedly from airmen who are frustrated by increasingly tone-deaf and overwrought approaches to this issue, but also because I believe her input raises (or renews) two important questions. First, what is the current Sexual Assault Prevention program doing for the Air Force? Second, what is it doing to the Air Force? Kayce’s input explores these questions in a powerful way. Enjoy and respond. -Q.

★ ★ ★ ★ ★

Dear SARC,

I got up this morning as an Airman in the United States Air Force. I got up and I put on my uniform, I pulled back my hair, I looked in the mirror and an Airman looked back. A strong, confident military professional stared out of my bathroom mirror, and I met her eyes with pride. Then I came to your briefing. I came to your briefing and I listened to you talk to me, at times it seemed directly to me, about sexual assault. You talked about a lot of things, about rivers and bridges, you talked about saving people and victimization. In fact you talked for almost a full ninety minutes, and you disgusted me.

You made me a victim today, and I am nobody’s victim. I am an American Airman in the most powerful Air Force in the world, and you made me into a helpless whore. A sensitive, defenseless woman who has no power to protect herself, who has nothing in common with the men she works with. You made me untouchable, and by doing that you made me a target. You gave me a transparent parasol, called it an umbrella and told me to stand idly by while you placed everything from rape to inappropriate shoulder brushes in a crowded hallway underneath it. You put my face up on your slides; my face, my uniform, my honor, and you made me hold this ridiculous contraption of your own devising and called me empowered. You called me strong. You told me, and everyone else who was listening to you this morning that I had a right to dictate what they said. That I had a right to dictate what they looked at. That I had a right to dictate what they listened to. That somehow, in my shop, I was the only person who mattered. That they can’t listen to the radio because they might play the Beatles, or Sir Mix-A-Lot, and that I might be offended. That if someone plays a Katy Perry song, I might have flashbacks to a night where I made a bad decision. I might be hurt, and I’m fragile right? Of course I am, you made me that way.

You are the reason I room alone when I deploy. You are the reason that wives are terrified that their husbands are cheating on them when they leave, and I leave with them. When I walk into a room and people are laughing and having a good time, you are the reason they take one look at me and either stop talking or leave. They’re afraid. They’re afraid of me, and it’s because of you. They are afraid that with all of this “power” I have, I can destroy them. They will never respect me or the power and the authority I have as a person, or the power I have as an Airman, because I am nothing more than a victim. That I as a victim, somehow I control their fate. With one sentence, I can destroy the rest of their lives.

“He sexually assaulted me.”

I say enough. He didn’t assault me, you did; and I say enough is enough. If you want to help me, you need to stop calling me a victim. If you want to save me, you need to help me to be equal in the eyes of the people I work with. If you want to change a culture, you need to lessen the gap between men and women, not widen it. Women don’t need their own set of rules: physical training scores, buildings, rooms, raters, sponsors, deployment buddies. When I can only deploy with another woman ‘buddy’ you are telling me and the people around me that I can’t take care of myself. When you forbid me from going into my male friends room to play X-Box on a deployment with the other people on my shift, you isolate me. When you isolate me, you make me a target. When you make me a target, you make me a victim. You don’t make me equal, you make me hated. If I am going to be hated, it will be because of who I am, not because of who you have made me. I am not a victim. I am an American Airman, I am a Warrior, and I have answered my nation’s call.

Help me be what I am, or be quiet and get out of my way.

Yet Another Reason To Dislike Windows?

Thursday, August 20th, 2009

I titled this post as a question, because I’m not sure if I’m missing something or what; please fill me in if I am. Here’s the story:

Today at work I had a Windows XP Pro machine suddenly decide that the automatic login was too convenient; it’s attached to a piece of inspection equipment, and the manufacturer set it up to be on its own domain and log in automatically. But when it was booted up today it decided it needed to have a password. And nobody knew the password.

I was able to guess the password after a few tries (they’re so predictable), but the question then became, how the heck do I re-enable the automatic login? The users on this machine really didn’t want to have to mess around with a password, so I poked around for a while in the Control Panel & Help system, but didn’t find any answers. I resorted to checking Microsoft’s knowledgebase, and found this gem of a solution:

  1. Click Start, click Run, type regedit, and then click OK.
  2. Locate the following registry key:
    • HKEY_LOCAL_MACHINE\SOFTWARE\Microsoft\Windows NT\CurrentVersion\Winlogon
  3. Using your account name and password, double-click the DefaultUserName entry, type your user name, and then click OK.
  4. Double-click the DefaultPassword entry, type your password under the value data box, and then click OK.

    If there is no DefaultPassword value, create the value. To do this, follow these steps:

    1. In Registry Editor, click Edit, click New, and then click String Value.
    2. Type DefaultPassword as the value name, and then press ENTER.
    3. Double-click the newly created key, and then type your password in the Value Data box.

    If no DefaultPassword string is specified, Windows XP automatically changes the value of the AutoAdminLogon registry key from 1 (true) to 0 (false) to turn off the AutoAdminLogon feature.

  5. Double-click the AutoAdminLogon entry, type 1 in the Value Data box, and then click OK.

    If there is no AutoAdminLogon entry, create the entry. To do this, follow these steps:

    1. In Registry Editor, click Edit, click New, and then click String Value.
    2. Type AutoAdminLogon as the value name, and then press ENTER.
    3. Double-click the newly created key, and then type 1 in the Value Data box.
  6. Quit Registry Editor.
  7. Click Start, click Restart, and then click OK.

Cool. Edit the registry to re-enable the auto-login. Genius. And that isn’t even touching the reason why it got disabled in the first place. Isn’t there an easier way to do this? For crying out loud…

Contrast that with Mac OS X (10.5.7 to be exact)…

  1. Click the Apple Menu, pull down to System Preferences, & click on Accounts,
  2. Flip the Automatic login: from Disabled to the login account you want to use, and enter the password when prompted.
  3. Go about your work, getting things done.

Now isn’t that a lot easier?

Progress Bars Gone Wild!

Wednesday, February 18th, 2009

One more thing that drives me crazy; progress bars that don’t give a realistic indication of your progress.

Case in point; today I was doing some maintenance on one of the laptops at work, and part of that was updating Adobe Acrobat Standard on an HP laptop running Windows XP Pro. It downloaded the 8.1.3 updater and proceeded to apply the update.

First, a larger status box came up and showed the status bar progressing quickly from left to right. But when the bar got all the way to the right, it just started over again. Over, and over, and over, and over…

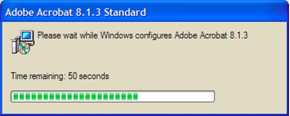
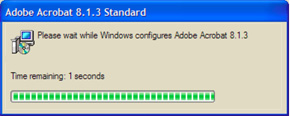
Then after a while, a smaller dialog box came up showing a slower moving progress bar, plus a “Time Remaining:” line; at first it showed 2 minutes, then about five minutes later it dropped to 1 minute.

Then about 10 minutes later it dropped to 50 seconds. And then about 5 minutes later it’s down to 1 second remaining.

And all the while the larger status bar is zipping right along, zip! zip! zip! zip! Hmmm. Not a confidence builder.

Finally, after about 20 minutes it throws up a dialog box saying it needs to restart the computer to complete the install. Good thing; I thought perhaps I’d been transported into something akin to the Groundhog Day story.

Windows Rant Of The Day — Outlook

Wednesday, January 21st, 2009

I’ve been using Microsoft Entourage — part of the Office for Mac suite — as my primary email client since about, oh, 1995 or so; it’s the one product out of Redmond that really made start to think that Microsoft products might not be so bad. But there seems to be a world of difference between Microsoft for Mac products and those for Windows, because Outlook — Entourage’s counterpart on the Windows side — isn’t nearly as refined.

I’m supporting Windows users pretty much full-time at work these days, so I figured I’d better use the software they use, to force myself to learn the ins & outs of it so I’m better able to answer the questions that come up. In the process of switching over to the Dark Side (yes, The Dark Side), I’m finding Outlook 2007 to be a huge disappointment. That probably shouldn’t be a surprise to me.

There are many things I don’t care for in Outlook, but one thing that really frosted my cookies a while back was trying to create a distribution list… In Entourage, it’s as easy as can be; you select the names in your address book that you’d like to add, create a new distribution list — or Group, as they’re called in Entourage — and POOF, your newly-created group is already populated with the contacts you had selected. What could be easier?

What could be easier? Certainly not Outlook… To create a Distribution List (DL) in Outlook, there is no possible way — at least none that I was able to find — for a selection in your Contacts list to be carried over to a new DL. None. Drag & drop doesn’t even work. The only way to add members to a DL is to tell Outlook to create the DL then click Select Members and scroll through the list to find the email addresses you want to add. (Notice I didn’t say you need to find the Contact you wanted to add; the only selection you can make is by email address; more on that a little later.) Sure you can use the dialog to narrow down the list, or search for a particular string in the Contacts list, but puts severe limits on your search.

For example, I wanted to create a DL that had email addresses from a particular domain. In the Contacts list you can use the Search Contacts field to narrow down the visible items to those that match what you type there; type in the domain name and your list is whittled down to those contacts containing email or web page addresses that match. But there is no way to get that into a DL! That flippin’ drives me crazy.

I think part of the reason that Entourage can pull off a trick so neatly when the same thing makes Outlook puke all over itself is that in an Entourage Address Book entry you can have a pile of email addresses for a given entry, but one of those addresses is set as the Default. That way you can select a bunch of contacts and it knows which address to use when you load them into a Group. Outlook… just don’t work that way. And that’s too bad.

I guess this is just another example of the left hand not knowing what the right hand is doing. Or an example of Microsoft being fat & lazy, not caring to make things easier for their user base.

Review — NuShield AG™

Tuesday, January 13th, 2009

My apologies to those who have been asking for this follow-up review; it’s been a long time coming. Since I wrote about the new iMac that was purchased for work and the trouble with it’s glossy screen (link), it’s been a crazy busy time at work with a major system upgrade, followed closely by the Christmas & New Year holidays, and trouble getting decent photos of the film installed on the iMac (and I’m still not happy with what I’ve got…) Now, finally, the planets seem to be in alignment and everything is coming together; if only I could sit down for more than a five minute stretch to finish this…

I ordered two NuShield AG™ Antiglare Screen Protectors for 24″ iMacs ($35 each) and one for my G4 PowerBook — it was inexpensive ($15) and I thought it might help avoid the scuff marks the keyboard was leaving on the original. They all arrived in a sturdy cardboard tube a week or so later, and I installed the film on my PowerBook that day, and the iMac the next day. The PowerBook went pretty smoothly; clean the ‘Book’s screen, clean the NuShield, pop the sides under the edges of the display bezel, and you’re done. The iMac? A little more involved.

The display fronts on the new-generation iMacs are flush with the aluminum case, so the NuShield film, as packaged for the iMac, is basically a rectangular sheet of their antiglare material with narrow adhesive strips around the perimeter that holds it in place. It’s cut to the same width as the display area on the front of the iMac, but the height is just a little shorter than the display to keep it from obscuring the iSight lens at the top-center of the screen. Of course the documentation accompanying the film says nothing about where it should be positioned, so it took a few tries to get it aligned just right. The CSI team would have no trouble figuring out who installed it; my fingerprints are all over that stickyback.

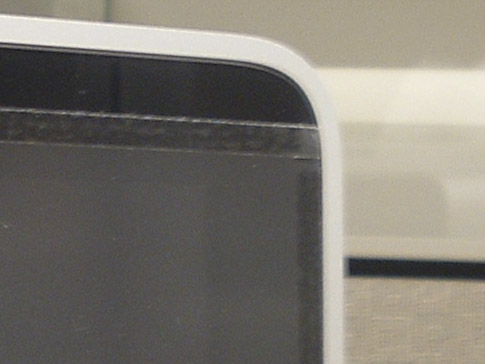
The fit & finish of the installed product was less than impressive. When examined up close it looks exactly like what it is — a piece of film tacked to the display. From a distance it looks fine, but up close the edges of the film stand out against the glossy black of the display frame, and the adhesive strips are easily seen. The corners are cut square, and at the bottom the corners extend past the black frame to overlap onto the aluminum case. You’d think it’d be an easy matter to match the radius of the display’s corners at the bottom; that would give it a more finished look.

After all the futzing around trying to get the thing on straight, I’m still not totally convinced that the sheet is cut square; no matter how I tried, I couldn’t get it quite straight. The edges still look like they’re not parallel with the adjacent display edges. After several attempts, I gave up & left it at somewhat of a happy medium that I’m not terribly happy with. But then again, I’m not looking at it 8 hours a day either.

Getting it positioned was about as easy as making sure that it & the screen on the iMac were dust free; as in, not very. I have to admit that I handicapped the process a little, as this particular user isn’t known for her housekeeping abilities and I didn’t take the time to clean the area first. It’s necessary to lay the sheet out flat during the installation, and any little speck of dust gets sucked right to the static-filled film. Note to self: if ever installing one of these again, make sure the desk and surrounding area are thoroughly cleaned first. And if I’d been thinking, I would’ve borrowed some dust elimination tools from our platemaking area; they used a roller with a slightly tacky surface to remove dust from plates, film and the vacuum exposure unit before exposing. That was all before we purchased a digital plate imager, but the roller is still around. That would’ve worked a treat for this! Next time. Yes, next time.

But once the film was installed, it did do a decent job of reducing the glare produced by the standard office lighting. Personally, I wasn’t too bothered by the glare, but the user for whom this iMac is home was bothered, and I haven’t heard a peep from her since installing the NuShield regarding glare, so that’s one measure of success.

There is a side effect produced by the film that is a bit bothersome; to reduce the glare, the NuShield film has a bit of a graininess to it — I suppose it’s the grainy surface that breaks up the reflections that would otherwise appear as glare to the user. But when the grainy surface is against the glossy front of the iMac, it produces a moiré-like pattern. Unfortunately, photographing this pattern is beyond the limited abilities of my equipment and me, so I can’t really show it well. But the graininess of the film and display’s pixels work together to make strange patterns on the screen. The severity of the pattern seems to vary according to the color on the display and how busy a pattern is displayed. To me, personally, this issue is more of a nuisance than the glare. But again, the user doesn’t seem to mind it at all. So for this particular installation, it does the job.

All in all, if the glare produced on your new iMac is an issue, the NuShield is an ok option. Not wonderful, but adequate. Were the glossy-screen iMac my primary computer, the glare would need to be pretty bad to make me want to install this product; the attachment method and moiré-like pattern produced by the film are big negatives to me, and the need for glare reduction would need to be pretty dire to offset those negatives. But again, that’s just me. A couple of small things NuShield could do to improve the product…

  1. … put a radius on the bottom corners of the film to match the display. I suppose I could do that myself, but…
  2. … the installation instructions that came with the film were pretty generic and didn’t cover the adhesive method used on the iMac at all; lots of room for improvement there.

The dearth of instructions specific to the iMac gives me the feeling that this is fairly new territory for NuShield. At least I hope that’s the case.

Since that first article I purchased and installed a second 24″ iMac with the glossy screen — I ordered the second NuShield knowing this purchase was coming up. However the guy using the second iMac isn’t bothered by the glare, so the film is still in its container. I’ll probably hang onto it in case we get another iMac that needs de-glossing.

The Virtual KVM Redux

Sunday, November 23rd, 2008

A post I wrote earlier this year, The Virtual KVM, has one of the highest page rankings on the site. That isn’t really saying much, but the fact that someone hits that page about every other day presumably looking for help in setting up a virtual kvm on two or more computers, and they end up here tells me that there isn’t a lot of information on the web to guide people through the process.

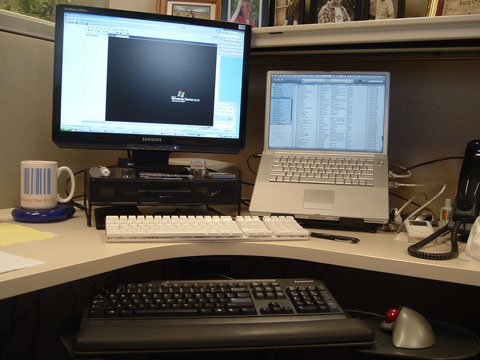
The virtual kvm is a software solution that allows the keyboard & mouse on one computer to control another (so it’s actually just a virtual kv, but who’s counting?) I use it on my desk at work; the desktop PC — an Athlon-powered Lenovo running Windows XP — is on the left, with the keyboard & mouse connected to it, and the PowerBook is on the right. I push the cursor to the right side of the PC’s screen and it jumps over to the Mac’s screen, and any keyboard or mouse input is transferred there. Almost like magic!

work_desk.jpg

Synergy is one of the more popular bits of software for getting the job done, but in its native form, it lacks a lot in the way of user-friendliness. When I first set things up, I found QuickSynergy was an easy way to get the two machines talking to each other. And all was great. Great that is until I upgraded the OS on the Mac to 10.5.

Not sure what it was, but something in 10.5 broke QuickSynergy. Every time it launched, it would hang and finally crash. I wasted a morning trying to get it to work, and nothing seemed to help, so I thought I’d take another stab at setting up Synergy on the Mac side. I couldn’t get it to work the first time, but I should be able to pull it off this time.

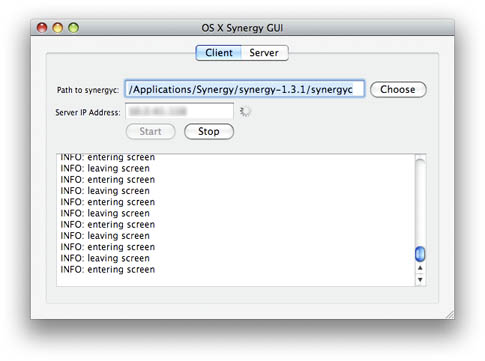
Before I had a chance to even download it, I bumped into OS X Synergy GUI, another open source app that works with Synergy, making configuration a whole lot easier. It’s not quite as pretty or polished as QuickSynergy — and it could sure use a custom icon — but it works, so I’m glad I was forced to look again.

Provided you’ve got Synergy running on the server side, getting it to work is pretty simple:

  • Download the Mac Synergy client/server package and decompress it,
  • Download the OS X Synergy GUI package and decompress it,
  • Launch the GUI,
  • Point it to the Synergy client app,
  • Enter the IP address of the server,
  • Click Start.
  • The server portion in the GUI hasn’t been implemented just yet, but the client is what I need, and it works great; even better than QuickSynergy. It connects quickly, and even has a nifty info window that tells you every time the mouse enters or leaves the screen, and any other issue that it thinks you need to know about.

    You can quit the app if you like; the synergyc process continues to run and keeps things connected. The only issue I’ve found with quitting the GUI is that when I close the PowerBook and go home, when I open it up in the morning it doesn’t always connect. I then have to go into Activity Monitor, track down the process and kill it, then open GUI again and restart it. Much easier to keep GUI running, then hit the Stop button when I disconnect, and start it up again in the morning.

    (more…)

    A Neat Cheat in Illustrator

    Wednesday, November 19th, 2008

    I discovered a neat but little-known trick in Adobe Illustrator

    At work customers often provide pdf files as “artwork”; no originating files, supporting files, or fonts. In most cases we can take that pdf, import it into ArtPro, and outline the fonts, but it’s sometimes a hassle. And there are times when I’m at home and would like to do that for a project too. And what about someone who doesn’t have ArtPro or Nexus… What’s a graphics geek to do?

    A properly created pdf will have all the needed fonts embedded within the file. Acrobat can open and correctly render the fonts because Acrobat can make use of the embedded fonts. But if you open that same pdf in Illustrator, those embedded fonts are useless, and when the fonts aren’t loaded on the system, Illustrator substitutes the fonts in the file with whatever it has on hand, and text goes all over the place. Totally unacceptable.

    But here’s a neat trick to get around that.

  • Launch Illustrator and create a new document,
  • Place the pdf file in the document you just created,
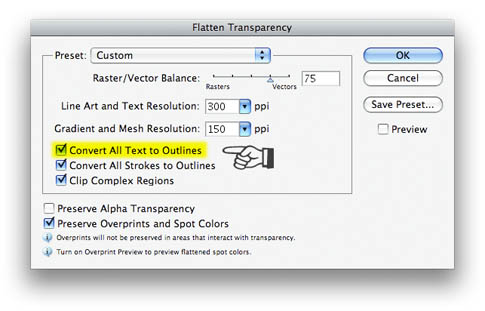
  • With the placed pdf selected, pull down in the Object menu to Flatten Transparency,
  • In the Flatten Transparency dialog box, make sure that Convert All Text To Outlines is checked,
    Hit OK.

    That placed pdf file then gets converted to native Illustrator objects, with all of the text in the pdf file converted to outlines. Even the quirky font that you’ve never seen before becomes an editable filled path in Illustrator. If you intend to keep the content from the pdf in Illustrator, it’s likely that some of the objects may need a little tweaking, especially if the pdf file originated in QuarkXPress. When I’ve done this, gradients built with spot colors in Quark come out as numerous solid color CMYK boxes with a clipping path. Not so neat, but easily remedied.

    For the record, I’ve tried this in Illustrator CS3 (v.13) and CS2 (v.12); not sure how far back it goes, but I’m guessing that it should work on any version that supports transparency; I think that was introduced in version 7 or 8. I haven’t upgraded to CS4 just yet (good God; already?!) so I don’t know for sure if it still works there, but chances are it does. It probably also works on the same products on the Windows side, but I’ve not tested it there either. YMMV.

    Have fun with it!

  • Windows Rant Of The Day: Removable Disks

    Monday, October 27th, 2008

    When something on a computer works well and works the way it should — intuitively — it’s said to be “Mac-like”. Windows XP and Vista are said to have many “Mac-like” features. But in working with XP the last few years, I’m left to wonder how could something as simple as adding a removable drive can be so decidedly un-Mac-like. I’m talking about connecting and disconnecting a removable drive from a computer.

    In the Mac OS, connecting & disconnecting any kind of external storage device to the system is painless & simple. Whether it be a USB thumb drive, a digital camera with onboard storage, or an external drive (connected via USB, Firewire, eSATA, or whatever), connecting it is a matter of plugging it into the appropriate port; the icon representing that volume (or volumes) appears on the desktop, and away you go. When you’re done with the device, you click on the volume on your desktop (or in a Finder window) and pull down in the Finder’s File menu to Eject (or hit Command-E, or drag the volume to the Trash). Once the device’s icon is gone, you can physically disconnect the device from the Mac. If there are files still in use, the system will complain by throwing up an alert; after you close whatever file is still open, then try again. Simple, straightforward, painless.

    Using USB thumb drives and true removable media isn’t much more difficult in Windows, but it’s still far from “Mac-like”. When you plug in a storage device it’ll usually pop up several bubbles on the system tray telling you it recognizes the device, and it’s ready to go. Sometimes you’ll need to install drivers for it, which is for the most part painless, but still, it’s one more step. Pulling the plug on the thing is when it gets interesting. An icon for the Safely Remove Hardware applet pops into the system tray when the device is plugged in; right-click on that icon and you get a somewhat confusing series of two or three dialog boxes that allow you to stop access to the device so it can be disconnected.

    Trying to do the same thing in Windows XP with a hard drive is a bit trickier, and so unMac-like it’s not even funny. I wrongly assumed that you could eject a drive from a Windows system like you could from a Mac; if nothing else, you could use the Safely Remove Hardware doodad for that. But not so.

    Last week I tried setting up a hot-swappable SATA drive (a Diamond Hard Drive Kit from Addonics) and a pair of 1TB drives on a PC at work… My plan was to have Retrospect back up the servers and several desktops to the hot-swap drive, then once a week I’d pull the drive out and replace it with another identical unit, always keeping one offsite for safety. That was the plan anyway. But Windows is making life difficult for me.

    Physically installing the drive tray in the PC and connecting it to the onboard SATA bus was pretty straightforward, as was setting up the disk after it was installed and the system booted up. But once the disk was mounted and accessible, what then? How do you eject it? With the Addonics unit, there is a key switch on the front panel that cuts power to the drive so that it can be removed. Nice feature and all, but Windows doesn’t allow such a thing to happen gracefully. In fact, hot swapping of drives is not natively supported in any current Windows product.

    I did some Googling to see if there were any 3rd party solutions for getting around this, and found a few that promised help in the task, but all were basically trying to trick Windows into thinking the disk was removable. They weren’t very convincing, and the system caught it every time. It’s still possible to cut power on the drive & pull it out. The system puts an error in the log complaining that some corruption might have occurred, and from what I was able to find, corruption does happen. Not terribly common, but it does happen. And when I’m yanking a 1TB drive out, it’s fairly important to me that the data remain intact. On top of the threat of corruption, the system was running pretty funkily when I did hot swaps without the proper tools. It took forever to recover from a reboot, and it just felt sluggish. So I had to find another way.

    Digging a little further, I found something on the Addonics website telling me what I’ve learned the hard way:

    Q4. I want to swap hard drive in and out of my computer without restarting my computer, will the Diamond drive kit support this and what components do I need?
    A. The Diamond Drive Cartridge System is designed for the hot swapping of drives without rebooting the computer. The Diamond Drive Cartridge System with SATA interface must be connected to a hot-swap compatible SATA controller. If this is not done, the removal or insertion of a Diamond enclosure will cause the system to freeze or reboot.

    Shame on me; I should have seen that before. The Windows OS doesn’t support hot-swapping drives without the proper hardware. Although the computer’s onboard SATA controller hardware will accept up to four SATA devices, it won’t allow hot-swapping, at least not without the proper adapter card. So I went shopping for a card that will allow hot swapping & found a fairly inexpensive one for not a lot of money; the PNY SATA S-Cure RAID card for $35. It arrived yesterday, I got it installed, and it worked great until I cut the power on the drive and pulled it out. At first it didn’t seem that the drive was gone at all because the system showed it still active — must’ve been cached information. After a few minutes the controller’s software had a conniption fit about the drive being gone, even after the drive had been reinserted and powered on again. I finally had to restart the machine to get it back to square one. Sheesh. As it turns out, I should have bought a non-RAID card; the card I bought was a RAID card, and will add and release disks that are part of an array, but won’t allow standalone disks to be connected & disconnected at will. A non-RAID supposedly will allow the SATA disk to appear as a removable drive to the system. A-shopping I will go. Again. With crossed fingers.

    For a short while I thought the solution would be to move the Addonics hot swap unit to a Mac, then share the drive over the network as a Windows volume. But the problem there is that native SATA support didn’t happen on the Mac until the G5’s hit the market, and none of the spare machines I have on hand or slated for semi-retirement (all G4’s) would be up to the job, at least not without adding an adapter card. The PNY RAID card might work in the Mac, but…

    All in all, the whole removable drive thing was a learning experience for me. The Mac may have had a leg up on the Windows machine, but because the Mac lacked the hardware to make it happen, I won’t find out any time soon. A question that remains unanswered is whether the Windows OS is unable to make use of the hot-swap feature because of a hardware shortcoming or if it’s software; I suspect it’s Windows, and am happy to lay the blame there (unless someone can prove me wrong.) If I were to install the unit in a G5, an Intel Mac, or say, a Psystar machine running OS X, with a spare onboard SATA port… Would the OS have a hard time with the drive being ejected? I’m pretty sure it would happen there without incident.

    As for using a plain vanilla removable drive on a Mac vs. a PC, the usability difference highlights one of the major benefits of using a Mac. A much superior user experience in that respect, and many more.

    Bonus Hint: The Safely Remove Hardware app is tucked away for safe keeping (I guess) and launching it without inserting a removable drive, while not impossible, isn’t easy. I found a discussion thread where someone posted a trick to do it; just right-click on your Desktop to create a New Shortcut. In the Create Shortcut dialog box that comes up, it’ll ask you to type the location of the item; type (or paste) %windir%\system32\rundll32.dll.Control_RunDLL hotplug.dll into that field, click Next, and give the shortcut a name, then you’ve got handy-dandy quick access to the SRH applet. As handy as that can be, anyway.

    Samsung Customer Disservice

    Monday, June 2nd, 2008

    This sucks. Samsung has just ripped me off, and I’m more than just a little angry about it.

    I bought a manufacturer recertified 22″ flat panel monitor (model 225BW) eCost.com in late February (which was delivered and put into use in early March). The monitor worked fine at first, but in the last week developed a problem with the DVI input; nothing connected to the DVI port will produce an image (but the VGA port does still work.)

    Since it was a remanufactured unit, I first called eCost, and was told that they only warrant the remanufactured monitors for 30 days; I’d have to go to the manufacturer. The first representative I spoke with at Samsung informed me that because the purchase date was more than 90 days ago (95 days, to be exact) the 90-day warranty has expired, and there is no recourse. I tried to explain that I did not actually take possession of the monitor until March 4, and that I contacted them about the issue as soon as I could, but that didn’t matter — the warranty period is measured from the date of purchase, and there are no exceptions for remanufactured items. A second representative in their so-called “Executive Group” told me the same, and again refused to make an exception.

    I am the sole IT support guy for my small business employer, and was the one who made the original purchase. I am also the one on whom my not very geeky coworkers rely for technical support issues. This problem first surface last week, when I happened to be on vacation, so the people here naturally waited until my return to get the problem resolved. I made the call at my first opportunity after returning to work this morning, but yet my request for service was denied. Logically, the warranty would either have a little bit of a grace period to allow for situations like this, or they would measure the warranty period by the date I took possession of the item, especially when purchased from an online retailer. I have no control over the item until I take physical possession of it at the time of delivery; why should the warranty begin before that time?

    It’s also very disappointing. I can understand that Samsung would want to stick to its warranty policy, but what this is telling me is that the organization is governed more by blind adherence to policy than by logic; extenuating circumstances apparently don’t mean a thing to them. It also tells me that they don’t want to stand behind their repair work… This monitor was presumably returned to their facilities and reworked by their personnel to what is deemed to be acceptable working condition. In this case, the monitor worked fine up to almost the day the warranty expired, which unfortunately happened to coincide with my time off from work. Now, a mere five business days beyond that magic date, I’m left out in the cold with a monitor that half works. The big question here is whether I could expect the same level of repair quality for an item returned to Samsung for warranty repairs. It doesn’t bode well for them.

    I have purchased a good number of Samsung products in the past, and have had few issues with them; in fact, I have a Samsung monitor on my own desk. But… you can be guaranteed that this incident marks the last of Samsung products being purchased by me for personal use or for use in this organization, as long as I’m making the purchasing decisions. They just lost a customer. Forever.

    Yeah, I realize buying remanufactured products is sometimes a shot in the dark, but still… this is very telling of Samsung’s customer service and public relations arm. And of their in-house service.

    Thanks for letting me vent a little more. I realize that vengeance isn’t mine, and my little blog entry won’t cause but a small ding in Samsung’s reputation, but I feel a little better. Just a little.