Archive for the ‘Mac Stuff’ Category

What Changes Will The Next 18 Years Bring?

Tuesday, March 23rd, 2010

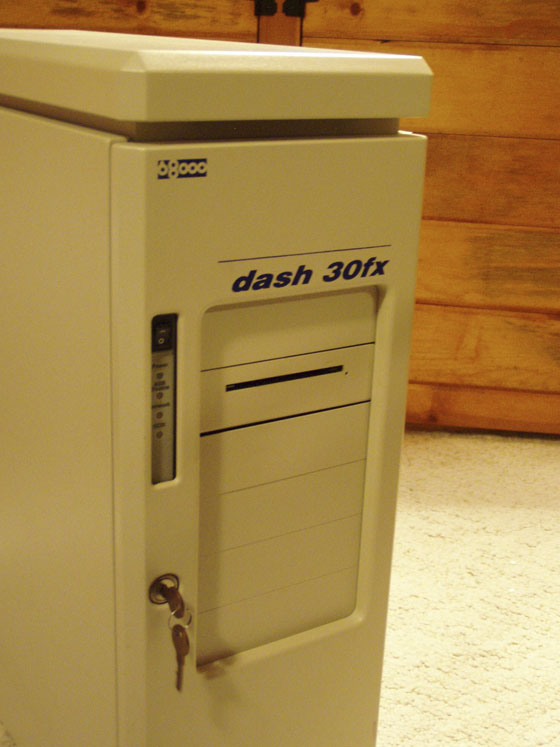
I was digging through my Sitemeter visitor stats a few days ago, and noticed again with a bit of wonder that one of the posts that consistently sees a fair bit of traffic is the one about the 68000 dash 30fx computer I have at home. The dash 30fx a monster of a Macintosh clone that was built without Apple’s blessing in the early ’90’s. The manufacturer got away with it by building the computer around the logic board of a IIfx purchased from Apple. The IIfx was no slouch in its day, but the 30fx stepped things up to the next rung, but at a high price.
dash_30fx_front_sm.jpg

You can read more about that relic in the old post, but seeing a bump in interest on that page made me wonder whether some of that traffic might be driven by some new chatter about those computers. So I did a little searching, and came up with several Google Books hits that I hadn’t seen before. One of them was a Network World article from June 15, 1992:
network_world_29_1992_06-15

The part that got me…

The network had to be Ethernet-based in order to accommodate the Macintosh equipment. But the bandwidth constraints of a conventional Ethernet LAN were insufficient for transmitting images ranging from 100M to 300M bytes in size.

That’s a blast from the past. I remember the days of 10baseT ethernet all too well, when pushing a 100MB file over an AppleTalk network would take a matter of minutes, and 300MB… Start the transfer and go take a coffee break! It makes me feel a bit old. The digital prepress shop described in the article sounds amazingly similar to to our shop at CCL where we used the dash 30fx along with a IIfx, some Quadra 950’s, a LaserWriter, a couple of Sun SPARCstation 2s (which served as raster image processors (RIPs) for a DuPont Crosfield imagesetter). Our operation was a lot smaller than the one described in the article, as we only had one Crosfield — they had ten. They may have had more equipment, but still dealt with the same constraints in moving data around the network.

I started work for CCL in 1991, and moved to the graphics department about a year later. I worked in traditional stripping, proof & platemaking for a while before transferring to the digital art department. Not long after getting in the door, the department’s tech guy decided to venture out on his own & started a digital imaging company. I was “promoted” to fill his shoes, providing tech support for the department in addition to my regular duties. In that position, one of my first tasks/learning opportunities was to move a couple of pieces of equipment around in the department, which involved making a couple of changes on the old thinnet daisy chain network. I started the job on a Friday afternoon after everybody else had left, and could not get it working again. Thinnet was as quirky as it gets; throughput may have been slow, but reliability & configuration flexibility were awful. That made the speed less of an issue I guess.

One of the projects my predecessor had started but hadn’t finished was upgrading the network in the department to 10Base-T twisted pair ethernet. The network drops were in place and most of the pieces were there, but we were still waiting on a few last pieces so we weren’t quite ready to pull the trigger on it. The trouble I had that evening helped me decide we were ready enough, so I blasted forward with the 10Base-T and figured I’d deal with the missing pieces afterward. I didn’t see much hope in getting the thinnet working, so even if I spent the whole weekend finishing the project up, I figured I could spend the same time with the thinnet and still end up with a slow dodgy network that might still not work. That turned out to be one of the best decisions I ever made. I had everything installed and working in less than an hour (after screwing around with the thinnet for four hours just trying to get it to work.) The few devices still on thinnet stayed on a little sub-network, with a Mac bridging the two segments. We limped along like that for a week or so until the rest of the equipment showed up, but just having things working — and working at five times the previous network speed — made it more than worthwhile. My boss was impressed!

I learned a lot on that first 10Base-T ethernet network; the 10 megabit speed in AppleTalk, combined with those early machines made image processing pretty time consuming. In 1992, pushing a 100MB file around the network indeed took a while, plus disk space was very expensive, so all kinds of extra work went into making things as compact as possible. Even on the state-of-the-art RIP running on that 90MHz Sparc 20 workstation, an eight-page layout literally took hours to process before it would begin imaging. A lot of times, we’d set up a layout, send it to the RIP and let the RIP chew on it overnight; if we somehow made a mistake somewhere along the line (it happened; not often, but it happened) we’d have to fix the foible & start all over again. Even before the job went to the RIP we’d examine the Quark, Illustrator & Photoshop files trying to find places we could streamline things a bit; Photoshop images that were scaled and/or rotated in Quark or Illustrator would take extra RIP time, so we’d take the time to re-do those files in Photoshop so they would be placed at 100% with no rotation.

Now though, eighteen years later, with RIPs running multiple 3GHz processors (with multiple cores), 4GB of memory, and gigabit ethernet, that same eight-page spread takes a matter of minutes to send to the RIP and for the RIP to process it. And modern operating systems, gigabit ethernet NIC’s and faster hardware make file transfers of several gigabytes pretty much a non-issue. Then there is disk space; one of the first purchases I had to make was a 1GB SCSI hard drive to replace one that had died in a Macintosh Quadra 950. I don’t remember exactly what I paid for it, but I know it was in the neighborhood of $1,000. Now you can buy a 1 terabyte drive for under $100! So with disk space so cheap and network transfer speeds so fast, the time we spent trimming file sizes and optimizing placement seems a total waste.

The years I’ve spent in this business have pretty much flown by At this point in my career, I’m probably in it for the duration. But thinking about how much things have changed since I started back in 1992 really makes me wonder what kind of changes and improvements the next 18 years will bring; cheaper, faster, smarter…

I Want Me An iPad

Wednesday, January 27th, 2010

Apple just introduced the iPad, and I want one. You can read about all the details and watch the demo movie in lots of places, so I won’t spend any time on that…

I just want one.

ipad

Yet Another Reason To Dislike Windows?

Thursday, August 20th, 2009

I titled this post as a question, because I’m not sure if I’m missing something or what; please fill me in if I am. Here’s the story:

Today at work I had a Windows XP Pro machine suddenly decide that the automatic login was too convenient; it’s attached to a piece of inspection equipment, and the manufacturer set it up to be on its own domain and log in automatically. But when it was booted up today it decided it needed to have a password. And nobody knew the password.

I was able to guess the password after a few tries (they’re so predictable), but the question then became, how the heck do I re-enable the automatic login? The users on this machine really didn’t want to have to mess around with a password, so I poked around for a while in the Control Panel & Help system, but didn’t find any answers. I resorted to checking Microsoft’s knowledgebase, and found this gem of a solution:

  1. Click Start, click Run, type regedit, and then click OK.
  2. Locate the following registry key:
    • HKEY_LOCAL_MACHINE\SOFTWARE\Microsoft\Windows NT\CurrentVersion\Winlogon
  3. Using your account name and password, double-click the DefaultUserName entry, type your user name, and then click OK.
  4. Double-click the DefaultPassword entry, type your password under the value data box, and then click OK.

    If there is no DefaultPassword value, create the value. To do this, follow these steps:

    1. In Registry Editor, click Edit, click New, and then click String Value.
    2. Type DefaultPassword as the value name, and then press ENTER.
    3. Double-click the newly created key, and then type your password in the Value Data box.

    If no DefaultPassword string is specified, Windows XP automatically changes the value of the AutoAdminLogon registry key from 1 (true) to 0 (false) to turn off the AutoAdminLogon feature.

  5. Double-click the AutoAdminLogon entry, type 1 in the Value Data box, and then click OK.

    If there is no AutoAdminLogon entry, create the entry. To do this, follow these steps:

    1. In Registry Editor, click Edit, click New, and then click String Value.
    2. Type AutoAdminLogon as the value name, and then press ENTER.
    3. Double-click the newly created key, and then type 1 in the Value Data box.
  6. Quit Registry Editor.
  7. Click Start, click Restart, and then click OK.

Cool. Edit the registry to re-enable the auto-login. Genius. And that isn’t even touching the reason why it got disabled in the first place. Isn’t there an easier way to do this? For crying out loud…

Contrast that with Mac OS X (10.5.7 to be exact)…

  1. Click the Apple Menu, pull down to System Preferences, & click on Accounts,
  2. Flip the Automatic login: from Disabled to the login account you want to use, and enter the password when prompted.
  3. Go about your work, getting things done.

Now isn’t that a lot easier?

Josh Wilson — Amazing Grace

Thursday, August 6th, 2009

I almost set the title to Josh Wilson — Amazing Guitar, but that’s not the name of the song…

Yvonne & I attended the Willow Creek Association Leadership Summit today (tomorrow too), and after our lunch break we were treated to a couple of songs by Josh Wilson. Josh is an incredibly talented guitarist who does some simply amazing things with his instrument (and some sort of foot-controlled electronic sampling gizmo on the floor.) Here’s a video of the same song, but in a different venue; have a listen, and enjoy!

(And hey; isn’t that a Mac Pro (or G5) in the background?)

When he was first introduced, I had no idea who he was, but I recognized his second song — Savior Please — just a few measures in. It was just him on stage with his guitar and the same sampling gizmo for this song, but he used a microphone to lay down background vocals with his own voice while performing. The sounds coming from just one guy and those two instruments was just… Wow! Here’s that song, again in a different venue and with his band playing along.

Even though he’s put his music up on Tangle and YouTube, I think I’ll have to go and buy it anyway, just to say thanks. I’d suggest you do the same; here are the iTunes links for Amazing Grace and for Savior, Please.

Review — NuShield AG™

Tuesday, January 13th, 2009

My apologies to those who have been asking for this follow-up review; it’s been a long time coming. Since I wrote about the new iMac that was purchased for work and the trouble with it’s glossy screen (link), it’s been a crazy busy time at work with a major system upgrade, followed closely by the Christmas & New Year holidays, and trouble getting decent photos of the film installed on the iMac (and I’m still not happy with what I’ve got…) Now, finally, the planets seem to be in alignment and everything is coming together; if only I could sit down for more than a five minute stretch to finish this…

I ordered two NuShield AG™ Antiglare Screen Protectors for 24″ iMacs ($35 each) and one for my G4 PowerBook — it was inexpensive ($15) and I thought it might help avoid the scuff marks the keyboard was leaving on the original. They all arrived in a sturdy cardboard tube a week or so later, and I installed the film on my PowerBook that day, and the iMac the next day. The PowerBook went pretty smoothly; clean the ‘Book’s screen, clean the NuShield, pop the sides under the edges of the display bezel, and you’re done. The iMac? A little more involved.

The display fronts on the new-generation iMacs are flush with the aluminum case, so the NuShield film, as packaged for the iMac, is basically a rectangular sheet of their antiglare material with narrow adhesive strips around the perimeter that holds it in place. It’s cut to the same width as the display area on the front of the iMac, but the height is just a little shorter than the display to keep it from obscuring the iSight lens at the top-center of the screen. Of course the documentation accompanying the film says nothing about where it should be positioned, so it took a few tries to get it aligned just right. The CSI team would have no trouble figuring out who installed it; my fingerprints are all over that stickyback.

The fit & finish of the installed product was less than impressive. When examined up close it looks exactly like what it is — a piece of film tacked to the display. From a distance it looks fine, but up close the edges of the film stand out against the glossy black of the display frame, and the adhesive strips are easily seen. The corners are cut square, and at the bottom the corners extend past the black frame to overlap onto the aluminum case. You’d think it’d be an easy matter to match the radius of the display’s corners at the bottom; that would give it a more finished look.

After all the futzing around trying to get the thing on straight, I’m still not totally convinced that the sheet is cut square; no matter how I tried, I couldn’t get it quite straight. The edges still look like they’re not parallel with the adjacent display edges. After several attempts, I gave up & left it at somewhat of a happy medium that I’m not terribly happy with. But then again, I’m not looking at it 8 hours a day either.

Getting it positioned was about as easy as making sure that it & the screen on the iMac were dust free; as in, not very. I have to admit that I handicapped the process a little, as this particular user isn’t known for her housekeeping abilities and I didn’t take the time to clean the area first. It’s necessary to lay the sheet out flat during the installation, and any little speck of dust gets sucked right to the static-filled film. Note to self: if ever installing one of these again, make sure the desk and surrounding area are thoroughly cleaned first. And if I’d been thinking, I would’ve borrowed some dust elimination tools from our platemaking area; they used a roller with a slightly tacky surface to remove dust from plates, film and the vacuum exposure unit before exposing. That was all before we purchased a digital plate imager, but the roller is still around. That would’ve worked a treat for this! Next time. Yes, next time.

But once the film was installed, it did do a decent job of reducing the glare produced by the standard office lighting. Personally, I wasn’t too bothered by the glare, but the user for whom this iMac is home was bothered, and I haven’t heard a peep from her since installing the NuShield regarding glare, so that’s one measure of success.

There is a side effect produced by the film that is a bit bothersome; to reduce the glare, the NuShield film has a bit of a graininess to it — I suppose it’s the grainy surface that breaks up the reflections that would otherwise appear as glare to the user. But when the grainy surface is against the glossy front of the iMac, it produces a moiré-like pattern. Unfortunately, photographing this pattern is beyond the limited abilities of my equipment and me, so I can’t really show it well. But the graininess of the film and display’s pixels work together to make strange patterns on the screen. The severity of the pattern seems to vary according to the color on the display and how busy a pattern is displayed. To me, personally, this issue is more of a nuisance than the glare. But again, the user doesn’t seem to mind it at all. So for this particular installation, it does the job.

All in all, if the glare produced on your new iMac is an issue, the NuShield is an ok option. Not wonderful, but adequate. Were the glossy-screen iMac my primary computer, the glare would need to be pretty bad to make me want to install this product; the attachment method and moiré-like pattern produced by the film are big negatives to me, and the need for glare reduction would need to be pretty dire to offset those negatives. But again, that’s just me. A couple of small things NuShield could do to improve the product…

  1. … put a radius on the bottom corners of the film to match the display. I suppose I could do that myself, but…
  2. … the installation instructions that came with the film were pretty generic and didn’t cover the adhesive method used on the iMac at all; lots of room for improvement there.

The dearth of instructions specific to the iMac gives me the feeling that this is fairly new territory for NuShield. At least I hope that’s the case.

Since that first article I purchased and installed a second 24″ iMac with the glossy screen — I ordered the second NuShield knowing this purchase was coming up. However the guy using the second iMac isn’t bothered by the glare, so the film is still in its container. I’ll probably hang onto it in case we get another iMac that needs de-glossing.

The Virtual KVM Redux

Sunday, November 23rd, 2008

A post I wrote earlier this year, The Virtual KVM, has one of the highest page rankings on the site. That isn’t really saying much, but the fact that someone hits that page about every other day presumably looking for help in setting up a virtual kvm on two or more computers, and they end up here tells me that there isn’t a lot of information on the web to guide people through the process.

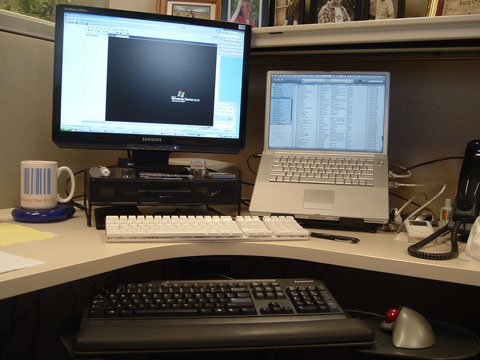
The virtual kvm is a software solution that allows the keyboard & mouse on one computer to control another (so it’s actually just a virtual kv, but who’s counting?) I use it on my desk at work; the desktop PC — an Athlon-powered Lenovo running Windows XP — is on the left, with the keyboard & mouse connected to it, and the PowerBook is on the right. I push the cursor to the right side of the PC’s screen and it jumps over to the Mac’s screen, and any keyboard or mouse input is transferred there. Almost like magic!

work_desk.jpg

Synergy is one of the more popular bits of software for getting the job done, but in its native form, it lacks a lot in the way of user-friendliness. When I first set things up, I found QuickSynergy was an easy way to get the two machines talking to each other. And all was great. Great that is until I upgraded the OS on the Mac to 10.5.

Not sure what it was, but something in 10.5 broke QuickSynergy. Every time it launched, it would hang and finally crash. I wasted a morning trying to get it to work, and nothing seemed to help, so I thought I’d take another stab at setting up Synergy on the Mac side. I couldn’t get it to work the first time, but I should be able to pull it off this time.

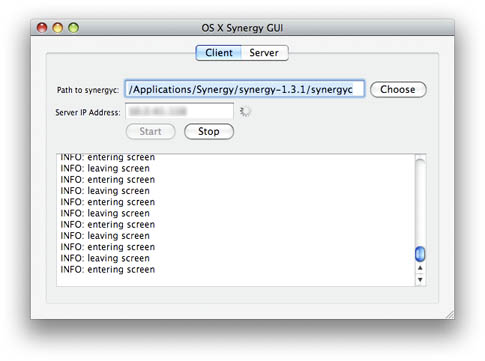
Before I had a chance to even download it, I bumped into OS X Synergy GUI, another open source app that works with Synergy, making configuration a whole lot easier. It’s not quite as pretty or polished as QuickSynergy — and it could sure use a custom icon — but it works, so I’m glad I was forced to look again.

Provided you’ve got Synergy running on the server side, getting it to work is pretty simple:

  • Download the Mac Synergy client/server package and decompress it,
  • Download the OS X Synergy GUI package and decompress it,
  • Launch the GUI,
  • Point it to the Synergy client app,
  • Enter the IP address of the server,
  • Click Start.
  • The server portion in the GUI hasn’t been implemented just yet, but the client is what I need, and it works great; even better than QuickSynergy. It connects quickly, and even has a nifty info window that tells you every time the mouse enters or leaves the screen, and any other issue that it thinks you need to know about.

    You can quit the app if you like; the synergyc process continues to run and keeps things connected. The only issue I’ve found with quitting the GUI is that when I close the PowerBook and go home, when I open it up in the morning it doesn’t always connect. I then have to go into Activity Monitor, track down the process and kill it, then open GUI again and restart it. Much easier to keep GUI running, then hit the Stop button when I disconnect, and start it up again in the morning.

    (more…)

    Windows Rant of the Day — Screenshots

    Thursday, April 10th, 2008

    I’ll be the first to admit that I’m spoiled by the Mac OS, and making a screenshot on the Mac is just one of many places where the Mac shines and the PC… um… doesn’t. For just about forever on the Mac, to take a screenshot of what’s in front of you, all you’d need to do is hit Shift-Command-3; you hear a little camera click noise, and you get a file on your desktop. Neat. And. Tidy.

    To get just a shot of a selected area, it’s Shift-Command-4; the cursor turns into a target shape that you can drag over the area you want to get a shot of, you hear the camera click, and you get the nifty .png file on your desktop. To get just a window is a little less intuitive, but once you know the trick it’s still dead easy — Shift-Command-4, then tap the Spacebar; the cursor turns into a little camera and any window your mouse hovers over is highlighted. If you can see the edge of a window that’s obscured by another window, you get a shot of the window you clicked on.

    In the current flavor of OS X the file you get is a .png named “Picture 1.png”, which can be emailed to just about any computer user on the planet and they can open it. The little .png files that end up on your desktop can be opened in Preview and saved out in a different file format if you like, or placed in or copied & pasted into or imported into most any application you like for more flexibility. Or you can just rename it and save it somewhere on your drive for future reference.

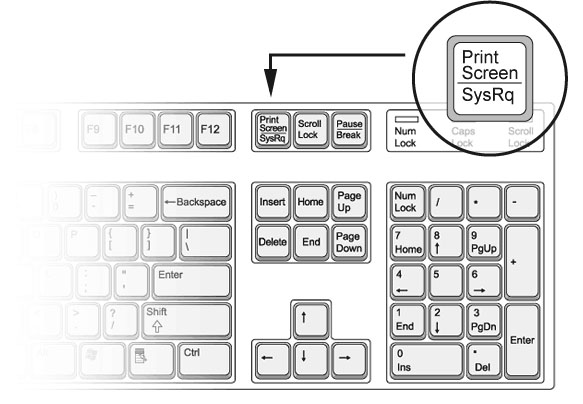
    And then there’s Windows. In my new role at work, I’m spending a lot more time in Windows XP (I even have an XP machine on my desk! Gasp!), and I’m learning some of the stuff I can do in my sleep on the Mac isn’t so easy on the PC. Getting a decent screenshot in Windows… it’s a little more involved. First you hit the Print Screen button, which copies the contents of your screen to your clipboard. Of course there’s no feedback whatsoever to tell you that anything has happened when you hit that button, but… Since you really can’t do anything with it sitting on your clipboard you first have to open a graphics or desktop publishing program, then paste the clipboard into and save it to a file from there.

    prtscrn.jpg

    Copying the current window to the clipboard is even less intuitive than the Mac; press Alt-PrintScreen (Alt-PrtSc) on the keyboard, then jump through the same hoops as before.

    I was on the phone with a tech support guy earlier today — on the PC — and needed to send him screenshots of three windows. That’s what spurred the inquiry into figuring out what it takes to get a shot of just a window, because with just the PrintScreen-paste-save trick I ended up with three 2.5MB files. I ended up bringing them over to the Mac, opening them in Photoshop (Preview would work also), cropping them down and saving out to jpeg format. Bleah. Took way too long. And that was after trying to crop the images down in Paint before saving them. It all helps me understand why Windows users tend to just click and send anything with little regard to file sizes; it’s just too much hassle to do anything about it.


    You know, looking back at this post, it looks like I’m comparing apples to apples from a UI standpoint; the shortcuts for getting a snapshot of a desktop or a window aren’t terribly intuitive for the new user either way. Windows seems less intuitive for me, probably because I’ve spent most of my working life in front of a Mac. But I think there’s more to it than that; first, when you take a screenshot on a Mac, you get audible feedback — the camera click — then you get a file, which can be dealt with on its own. If you really want to bring that photo into a separate app, you can, but you don’t have to.

    And on Windows, the button to use is Print Screen, or PrintScreen, or PrtScrn, or whatever manglish the keyboard manufacturer could come up with. But I don’t want to print the screen; I want a screenshot of it! That’s about as far from intuitive as you can get. Sure there are other 3rd party apps available to make it easier (none of which I found today were free) but Apple proves that you don’t have to hunt something down to do a job like that. Heck, Apple even gives every OS X user a copy of Grab that gives you even more options for taking snapshots. For free.

    Ok, I’m done complaining. But even through all the complaining I can still be thankful; thankful that I have a PC on my desk to make me appreciate the Mac all the more. And thankful more that I still have a Mac on my desk!

    An Oversight

    Thursday, February 14th, 2008

    davintosh.jpg

    Whoops. I just realized I overlooked something on my site that shouldn’t have been overlooked.

    The site is named davintosh — my name is Dave and I work with Macintoshes; davintosh. Ok, so it’s a little corny and I’m even embarrassed to tell my wife about it. Sue me.

    Anyway, as I was writing the last post — which had a lot to do with Macs — and setting the categories, it dawned on me that there was no category for things Mac. How could this be?

    So now it’s fixed. I may have to dig back through the posts I’ve already written and set them to reflect the presence of the new category (I think I just used “Computers” before).

    VNC on the Mac

    Thursday, February 14th, 2008

    &otI’ve got need at work for running VNC on one of the machines so an app running on it can be shared with multiple users on the network. VNC is a great solution that’s been out there for a long time, but in general it kinda sucks because, 1. it’s slow, 2. the image resolution is crappy, and 3. it’s slow.

    Did I mention it was slow? Well, it is.

    I’ve been using Chicken of the VNC for a long time, and it works reasonably well for remotely controlling the PC servers I manage on the network, but today I tried using it to control a Mac and it puked all over the task. Wouldn’t pull up a screen at all; just gave an error — Connection Terminated: Zlib inflate error: invalid block type. That was it for me; I decided to shop around for a newer/faster/better solution.

    I’ve also used Apple Remote Desktop, which would be a nice option because it’s got a lot of additional features I could put to use. But it’s expensive too; $300 for a 10 Managed Systems edition, which allows for one administrator. I’m not sure, but I think that means there can be up to 10 systems that can be controlled, but only one machine that can do the controlling. That mule don’t pull in the job I’m needing filled.

    One thing I discovered on my visit to Apple’s site is that ARD is basically VNC built into the Mac OS (at least for 10.4 and above). Enabling the VNC server on a Mac is as easy as opening the Sharing Preferences pane in System Preferences, turning on Apple Remote Desktop, and enabling VNC control in the window that pops up. That allows any machine running a VNC client to hook up via port 5900 and control it. Slick. And. Easy. (great set of instructions at MacMiniColo.net.)

    But then a Google search led me to Vine VNC; wow. Just wow. Does it work nicely or what. It pulled up the screen for the Mac in question with no problem. The screen resolution on that machine is larger than the screen on my lowly PowerBook, but no problem; the scroll wheel on my mouse allows me to move around in the window just like it should. The screen resolution and color on the remote Mac window is beautiful, just as it should be. It just works.

    Vine isn’t free, but at $30 it’s not bad either. I gladly ponied up for it (besides, it wasn’t my money!)

    Before I bought Vine, I dug around a little more on Apple’s site and found another VNC option, JollysFastVNC. Very nice freebie. Not quite as nice as Vine — the Ctrl-Alt-Del command requires a trip to the menu bar, whereas Vine lets you do it on the keyboard — but still very nice. Relatively fast, nice resolution, and free.

    So, to cap it off, using VNC on the Mac doesn’t have to be a painful experience. There are some great solutions out there, but as has always been the case with Mac software, it takes a little digging to find what you’re looking for that works well.

    jolly.jpgvine.jpg

    Beginner’s Guide To Quicksilver

    Sunday, May 27th, 2007

    Quicksilver

    Quicksilver is one of those OS X apps that I could do without, but would rather not. It speeds up many of the things that need to be done on my Macs and makes it so very much easier to get around in the OS. But, as is the case with many great applications, there is so much to Quicksilver that it’s hard to explain, and harder to get the most out of it.

    The guys over at Lifehacker have put together a beginner’s guide to using Quicksilver. Even though I’ve been using Quicksilver for a long time, just browsing through the guide tells me that I’ve got a thing or two to learn as well.