Archive for November, 2008

The Virtual KVM Redux

Sunday, November 23rd, 2008

A post I wrote earlier this year, The Virtual KVM, has one of the highest page rankings on the site. That isn’t really saying much, but the fact that someone hits that page about every other day presumably looking for help in setting up a virtual kvm on two or more computers, and they end up here tells me that there isn’t a lot of information on the web to guide people through the process.

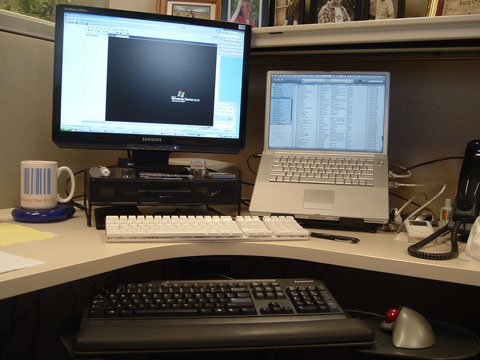
The virtual kvm is a software solution that allows the keyboard & mouse on one computer to control another (so it’s actually just a virtual kv, but who’s counting?) I use it on my desk at work; the desktop PC — an Athlon-powered Lenovo running Windows XP — is on the left, with the keyboard & mouse connected to it, and the PowerBook is on the right. I push the cursor to the right side of the PC’s screen and it jumps over to the Mac’s screen, and any keyboard or mouse input is transferred there. Almost like magic!

work_desk.jpg

Synergy is one of the more popular bits of software for getting the job done, but in its native form, it lacks a lot in the way of user-friendliness. When I first set things up, I found QuickSynergy was an easy way to get the two machines talking to each other. And all was great. Great that is until I upgraded the OS on the Mac to 10.5.

Not sure what it was, but something in 10.5 broke QuickSynergy. Every time it launched, it would hang and finally crash. I wasted a morning trying to get it to work, and nothing seemed to help, so I thought I’d take another stab at setting up Synergy on the Mac side. I couldn’t get it to work the first time, but I should be able to pull it off this time.

Before I had a chance to even download it, I bumped into OS X Synergy GUI, another open source app that works with Synergy, making configuration a whole lot easier. It’s not quite as pretty or polished as QuickSynergy — and it could sure use a custom icon — but it works, so I’m glad I was forced to look again.

Provided you’ve got Synergy running on the server side, getting it to work is pretty simple:

  • Download the Mac Synergy client/server package and decompress it,
  • Download the OS X Synergy GUI package and decompress it,
  • Launch the GUI,
  • Point it to the Synergy client app,
  • Enter the IP address of the server,
  • Click Start.
  • The server portion in the GUI hasn’t been implemented just yet, but the client is what I need, and it works great; even better than QuickSynergy. It connects quickly, and even has a nifty info window that tells you every time the mouse enters or leaves the screen, and any other issue that it thinks you need to know about.

    You can quit the app if you like; the synergyc process continues to run and keeps things connected. The only issue I’ve found with quitting the GUI is that when I close the PowerBook and go home, when I open it up in the morning it doesn’t always connect. I then have to go into Activity Monitor, track down the process and kill it, then open GUI again and restart it. Much easier to keep GUI running, then hit the Stop button when I disconnect, and start it up again in the morning.

    (more…)

    “A Doctor’s Wisdom”

    Sunday, November 23rd, 2008

    A worried woman went to her gynecologist and said: “Doctor, I have a serious problem and desperately need your help! My baby is not even 1 year old and I’m pregnant again. I don’t want kids so close together.”

    So the doctor said: “OK, and what do you want me to do?”

    She said: “I want you to end my pregnancy, and I’m counting on your help with this.”

    The doctor thought for a little, and after some silence he said to the lady: “I think I have a better solution for your problem. It’s less dangerous for you too.”

    She smiled, thinking that the doctor was going to accept her request.

    Then he continued: “You see, in order for you not to have to take care of 2 babies at the same time, let’s kill the one in your arms. This way, you could rest some before the other one is born. If we’re going to kill one of them, it doesn’t matter which one it is. There would be no risk for your body if you chose the one in your arms.”

    The woman was horrified and said: “No doctor! How terrible! It’s a crime to kill a child!”

    “I agree,” the doctor replied. “But you seemed to be OK with it, so I thought maybe that was the best solution.” The doctor smiled, realizing that he had made his point.

    He convinced the mom that there is no difference in killing a child that’s already been born and one that’s still in the womb. The crime is the same, even if killing the unborn child is “legal”.

    A Neat Cheat in Illustrator

    Wednesday, November 19th, 2008

    I discovered a neat but little-known trick in Adobe Illustrator

    At work customers often provide pdf files as “artwork”; no originating files, supporting files, or fonts. In most cases we can take that pdf, import it into ArtPro, and outline the fonts, but it’s sometimes a hassle. And there are times when I’m at home and would like to do that for a project too. And what about someone who doesn’t have ArtPro or Nexus… What’s a graphics geek to do?

    A properly created pdf will have all the needed fonts embedded within the file. Acrobat can open and correctly render the fonts because Acrobat can make use of the embedded fonts. But if you open that same pdf in Illustrator, those embedded fonts are useless, and when the fonts aren’t loaded on the system, Illustrator substitutes the fonts in the file with whatever it has on hand, and text goes all over the place. Totally unacceptable.

    But here’s a neat trick to get around that.

  • Launch Illustrator and create a new document,
  • Place the pdf file in the document you just created,
  • With the placed pdf selected, pull down in the Object menu to Flatten Transparency,
  • In the Flatten Transparency dialog box, make sure that Convert All Text To Outlines is checked,
    Hit OK.

    That placed pdf file then gets converted to native Illustrator objects, with all of the text in the pdf file converted to outlines. Even the quirky font that you’ve never seen before becomes an editable filled path in Illustrator. If you intend to keep the content from the pdf in Illustrator, it’s likely that some of the objects may need a little tweaking, especially if the pdf file originated in QuarkXPress. When I’ve done this, gradients built with spot colors in Quark come out as numerous solid color CMYK boxes with a clipping path. Not so neat, but easily remedied.

    For the record, I’ve tried this in Illustrator CS3 (v.13) and CS2 (v.12); not sure how far back it goes, but I’m guessing that it should work on any version that supports transparency; I think that was introduced in version 7 or 8. I haven’t upgraded to CS4 just yet (good God; already?!) so I don’t know for sure if it still works there, but chances are it does. It probably also works on the same products on the Windows side, but I’ve not tested it there either. YMMV.

    Have fun with it!

  • Anti-Glare Solution For Glossy Macs

    Tuesday, November 18th, 2008

    We just set up a spiffy new 24″ Aluminum iMac in the graphics department at work; what a gorgeous display on that thing! Unfortunately, Apple has decided for us that you can have any finish you want on your monitor, as long as it’s glossy. And that was one of the things the new user on that machine just couldn’t abide.

    I checked around a bit, and found a lot of people are grousing about the glossy screens, most of them in the graphics industry. With the glossy screen you get a lot of reflection from anything around you, especially in a well-lit room. That not only makes adjusting color difficult, it’s really, really distracting. Personally, I don’t think I’d mind it so much, but the user on this particular machine isn’t quite as accommodating as yours-truly.

    One solution would be to dim the lights in the room, but that isn’t a realistic possibility at work, in a large room with cubicles. In digging around for a solution to the glossy screen problem, I did find a few solutions. One that does show some promise is sold by NuShield:

    NuShield AG™ Antiglare Screen Protector Film

    The harsh lighting in most office and industrial environments can make it almost impossible to do your job well when you have to rely on hard-to-read LCD screens. After a year in development, NuShield AG Antiglare Screen Protector Film will minimize annoying surface glare under bright lights indoors or in an office/industrial setting. The antiglare film also hides fingerprints and filters out 99% of UV light from reaching the screen or reflecting back to your eyes.

    NuShield films are non-adhesive, held in place by tabs that wedge between the edge of the screen and the case. I would imagine static and suction also help to keep it in place, but I do like the no-adhesive thing. NuShield makes films for all kinds of applications, mostly to improve the durability of flat panel screens on monitors, laptops and handhelds.

    There’s not much on their website that isn’t marketing material; I suppose it’s a little difficult to demonstrate the effectiveness of a product like this with just photos. But the film isn’t terribly expensive, so I just ordered one for the iMac ($35) and one for my PowerBook ($15) as well. They have a handy-dandy product selector that shows custom-cut film to fit most all of the Apple products with built-in screens, and lots of other manufacturers also. So I figured it’d be ok to spend the money to give it a whirl (especially when it’s not my money!) I’ll post an update once my order arrives and I have it installed.

    Another possibility is to use a hood over the monitor. There was a day when hoods were pretty much standard equipment on high-end CRT monitors, but it’s been years since I threw the last one out. They usually ended up stashed under a desk, collecting dust. Well, they’re still out there; Compushade makes a universal fit model, priced in the mid-$40 range, and Photodon makes a much nicer hood, custom-fit for the iMacs for about the same money. Another option is to go with some cardboard cut to fit and spray-painted flat black. We’ll see how the film works out, and decide whether to give the hood a try.

    Edit: Click here to go to the review I wrote for the NuShield film.

    My RJ-45 Zipper Pull Mod

    Tuesday, November 18th, 2008

    Last spring, the zipper pull broke on my light jacket. I used a paper clip as a temporary replacement, but that looked pretty nerdy. I wore it last week, and felt a bit self-conscious about it, and was careful to keep the clip hidden while out & about, and was thinking seriously about replacing it. After all, it was getting to be several years old, and not exactly the peak of winter fashion.

    But last Friday I walked in the front door carrying my tool bag, I had a sudden burst of inspiration; why not use a bit of wire and an RJ-45 plug for the zipper pull? It’d be the perfect geek accessory on the jacket!

    So here is the final result. I’ll call it Version 1.

    It was pretty simple, really; I took a length of Cat. 5 cable about 4 inches long, pulled the twisted pairs out of it and threaded two pairs through the business end of the zipper. I then doubled the wires back, straightened them out — being careful to arrange the colored wires in an aesthetically-pleasing manner — and clipped them off about 2 inches from the zipper. Then the RJ-45 went on the end and got crimped down, and there you have it!

    The same thing could be done with an RJ-11 plug and a single twisted pair, but the RJ-45 allows for two pairs, and presumably double the strength.

    A couple of afterthoughts about this mod upon completion; a much cleaner installation could be achieved by slipping some Cat. 5 cable jacket or heat-shrink tubing over the wire before crimping the connector in place… Just enough to fit in between the zipper and the crimp. As it is, the small amount of exposed wire doesn’t really present the effect I was hoping for. Another option would be to use solid color wire, and the same color on all four strands. That would allow the color to be coordinated with the jacket, giving a more pleasing color combination. Or maybe just wrap some black electrical tape around the exposed wires… It’d be nice to have a molded end on the plug, but that’d probably involve a used cable as most of those are molded with the cable in place. There you’d have to do some kind of twisting and/or soldering on the backside of the zipper to keep it in place. But then again I have seen some patch cables that have hoods that aren’t molded in place and could be slid onto the thing; I’ll have to keep my eye out for one of those for Version 2.

    A Cool Old Trunk

    Sunday, November 16th, 2008

    I spotted this trunk at a garage sale this summer, filled with some old tools that I wanted. It was a package deal, and even though I had no idea what I’d use the trunk for, the price was right, so I took it home.

    The trunk looks to be built of some rough wood underneath, but it’s covered on the outside with tin with hardwood strips holding it in place. The nails holding it all together have some cool rosette-shaped heads on them… It was probably quite a fancy thing in its day. The inside is covered with some cheap wallpaper-type stuff, with a slightly cheesy picture in the middle of the top.

    The trunk has definitely seen better days; the tin on the top is cracked/ripped lengthwise, and a chunk of it is missing behind the latch. The latch doesn’t work, and the hinges are missing their pins, allowing the lid to be lifted off completely. That should be an easy fix, but I still haven’t got around to that. And the wallpaper inside is pretty badly faded and peeling in places.

    The inside stank really bad when I first brought it home; it had probably been left sitting in a garage or workshop for a lot of years, with who-knows-what inside it. Leaving it sit out in the sun for several days this summer helped immensely in that department; much, much better now.

    Well, I’ve had it for four months, and still don’t know what to do with it. Our house really has no need for more furniture, and as big as this thing is, there’s no room for something not needed… So on to CraigsList it goes.

    A Little Left Of Centrist

    Tuesday, November 11th, 2008

    I saw this cartoon at American Thinker last week, and thought it fit the situation perfectly. We as a country have just elected another guy who ran as something he is not and has no intention of being. Barack Obama is likely as far left as anyone in Washington, DC, yet he ran not as a leftist, but a centrist. Why? Because he knows he wouldn’t stand a chance of getting elected if he didn’t hide who he really was or what he really wanted for this country.

    Actually, the entire ordeal is very reminiscent of 1992, when William Jefferson Clinton became the first President elected without receiving a majority of the votes cast. Clinton’s ride to the White House was marked by claims that he was “a new Democrat”, vowing to work with both sides of Congress to do what’s right for the country. In those days I was admittedly pretty naive politically, and I took him at his word. His word proved to be worth little, as he demonstrated in the coming two years, taking the side of the Democrats and demonizing the Republicans at every turn, especially during the 1994 election cycle. It was then that I more closely examined what I believed was right in the world of politics and compared it against the platforms of both parties; I changed my registration to Republican that year, and haven’t looked back.

    Obama isn’t as politically savvy as Clinton, and despite his handlers’ best efforts, managed to show some cracks in his centrist veneer during the campaign, revealing his true ideological identity to be way, way to the left. Of course, that didn’t get much attention in the mainstream press… It would’ve made him look bad, and that’s the last thing they wanted.

    Now that he’s won the election, we’re likely to see his true colors. His pick for Chief of Staff is Rahm Emanuel; not exactly known for “reaching across the aisle” unless it’s an attempt to smack a right-winger upside the head. Jon Podesta is working as co-chairman of the transition team; he’s got about as much in common with Congressional Republicans as Obama. If those two are a sign of things to come… Well, it’s only going to get interestinger still.

    But still, as a Christian I’m called to pray for those in authority; that’s especially important when I think they’re up to no good. God can work untold miracles even in and through people who are far from him.

    The 3 Square Puzzler

    Saturday, November 8th, 2008

    I stopped at a garage sale a few weeks back and found a couple of good deals; one of them was this neat old game — The 3 Square Puzzler.

    The box is pretty nondescript, and looks like it’s seen better days.

    Inside is a milled & finished oak block with a series of holes for moving the pegs. The pegs themselves are pretty heavy duty; all metal. The finish on the gold-colored pegs is a bit worn, but it’s still pretty easy to tell which is which.

    The goal of the game is for one player to move the silver pegs to the holes occupied by the gold pegs before the other player moves the gold pegs to the other side. The rules are pretty simple; you move the pieces one hole at a time, jumping other pegs when possible, much like Chinese Checkers.

    It’s a fun game, and kind of a classy relic. The label on the box is pretty faded, but still somewhat legible;
    SETKO MODEL NO. 8114
    3 SQUARE PUZZLER
    another HOYLE OFFICIAL game

    In addition to the instructions on the inside of the box lid, there is a line that says the copyright was obtained in 1964 by the “Set Screw & Mfg. Co.” A Google search on that name comes up empty, but it kinda makes sense that a set screw manufacturer would make something like this.

    Probably not much of a collector’s piece, but I like it. Not bad for 25 cents, eh?

    POTUS #44

    Wednesday, November 5th, 2008

    “Enlightened statesmen will not always be at the helm.”

    James Madison
    Federalist No. 10

    May God have mercy on us all.

    Animusic Pipe Dreams

    Sunday, November 2nd, 2008

    Miss C. posted this video on her site over the weekend, referring to it as, “An oldie that never gets old”. Well, it may be old in Internet terms (2006) but I’d never seen it before, and it’s truly worth watching. And it turns out the animators — Animusic — has put out two videos with similar content. Too cool!

    Watching it, I can’t help but appreciate the time and thought that had to go into this piece… I’m sure the animators started with the music, and then worked backward to synchronize the balls striking the instruments, then figured out where the balls would go afterward. The timing, the creative use of percussion, the movement through the 3D space… Very, very cool. Had to be done in animation, cuz it would never, ever work in real life. You’d have extra noise from the balls rattling through the PVC and balls flying everywhere; no way could you aim balls coming out of a common tube to strike instruments in different locations. But I guess that’s where the name comes from!

    Never mind my geeking over the details; just enjoy!