Archive for the ‘Cool Technology’ Category

The Virtual KVM Redux

Sunday, November 23rd, 2008

A post I wrote earlier this year, The Virtual KVM, has one of the highest page rankings on the site. That isn’t really saying much, but the fact that someone hits that page about every other day presumably looking for help in setting up a virtual kvm on two or more computers, and they end up here tells me that there isn’t a lot of information on the web to guide people through the process.

The virtual kvm is a software solution that allows the keyboard & mouse on one computer to control another (so it’s actually just a virtual kv, but who’s counting?) I use it on my desk at work; the desktop PC — an Athlon-powered Lenovo running Windows XP — is on the left, with the keyboard & mouse connected to it, and the PowerBook is on the right. I push the cursor to the right side of the PC’s screen and it jumps over to the Mac’s screen, and any keyboard or mouse input is transferred there. Almost like magic!

work_desk.jpg

Synergy is one of the more popular bits of software for getting the job done, but in its native form, it lacks a lot in the way of user-friendliness. When I first set things up, I found QuickSynergy was an easy way to get the two machines talking to each other. And all was great. Great that is until I upgraded the OS on the Mac to 10.5.

Not sure what it was, but something in 10.5 broke QuickSynergy. Every time it launched, it would hang and finally crash. I wasted a morning trying to get it to work, and nothing seemed to help, so I thought I’d take another stab at setting up Synergy on the Mac side. I couldn’t get it to work the first time, but I should be able to pull it off this time.

Before I had a chance to even download it, I bumped into OS X Synergy GUI, another open source app that works with Synergy, making configuration a whole lot easier. It’s not quite as pretty or polished as QuickSynergy — and it could sure use a custom icon — but it works, so I’m glad I was forced to look again.

Provided you’ve got Synergy running on the server side, getting it to work is pretty simple:

  • Download the Mac Synergy client/server package and decompress it,
  • Download the OS X Synergy GUI package and decompress it,
  • Launch the GUI,
  • Point it to the Synergy client app,
  • Enter the IP address of the server,
  • Click Start.
  • The server portion in the GUI hasn’t been implemented just yet, but the client is what I need, and it works great; even better than QuickSynergy. It connects quickly, and even has a nifty info window that tells you every time the mouse enters or leaves the screen, and any other issue that it thinks you need to know about.

    You can quit the app if you like; the synergyc process continues to run and keeps things connected. The only issue I’ve found with quitting the GUI is that when I close the PowerBook and go home, when I open it up in the morning it doesn’t always connect. I then have to go into Activity Monitor, track down the process and kill it, then open GUI again and restart it. Much easier to keep GUI running, then hit the Stop button when I disconnect, and start it up again in the morning.

    (more…)

    A Neat Cheat in Illustrator

    Wednesday, November 19th, 2008

    I discovered a neat but little-known trick in Adobe Illustrator

    At work customers often provide pdf files as “artwork”; no originating files, supporting files, or fonts. In most cases we can take that pdf, import it into ArtPro, and outline the fonts, but it’s sometimes a hassle. And there are times when I’m at home and would like to do that for a project too. And what about someone who doesn’t have ArtPro or Nexus… What’s a graphics geek to do?

    A properly created pdf will have all the needed fonts embedded within the file. Acrobat can open and correctly render the fonts because Acrobat can make use of the embedded fonts. But if you open that same pdf in Illustrator, those embedded fonts are useless, and when the fonts aren’t loaded on the system, Illustrator substitutes the fonts in the file with whatever it has on hand, and text goes all over the place. Totally unacceptable.

    But here’s a neat trick to get around that.

  • Launch Illustrator and create a new document,
  • Place the pdf file in the document you just created,
  • With the placed pdf selected, pull down in the Object menu to Flatten Transparency,
  • In the Flatten Transparency dialog box, make sure that Convert All Text To Outlines is checked,
    Hit OK.

    That placed pdf file then gets converted to native Illustrator objects, with all of the text in the pdf file converted to outlines. Even the quirky font that you’ve never seen before becomes an editable filled path in Illustrator. If you intend to keep the content from the pdf in Illustrator, it’s likely that some of the objects may need a little tweaking, especially if the pdf file originated in QuarkXPress. When I’ve done this, gradients built with spot colors in Quark come out as numerous solid color CMYK boxes with a clipping path. Not so neat, but easily remedied.

    For the record, I’ve tried this in Illustrator CS3 (v.13) and CS2 (v.12); not sure how far back it goes, but I’m guessing that it should work on any version that supports transparency; I think that was introduced in version 7 or 8. I haven’t upgraded to CS4 just yet (good God; already?!) so I don’t know for sure if it still works there, but chances are it does. It probably also works on the same products on the Windows side, but I’ve not tested it there either. YMMV.

    Have fun with it!

  • Anti-Glare Solution For Glossy Macs

    Tuesday, November 18th, 2008

    We just set up a spiffy new 24″ Aluminum iMac in the graphics department at work; what a gorgeous display on that thing! Unfortunately, Apple has decided for us that you can have any finish you want on your monitor, as long as it’s glossy. And that was one of the things the new user on that machine just couldn’t abide.

    I checked around a bit, and found a lot of people are grousing about the glossy screens, most of them in the graphics industry. With the glossy screen you get a lot of reflection from anything around you, especially in a well-lit room. That not only makes adjusting color difficult, it’s really, really distracting. Personally, I don’t think I’d mind it so much, but the user on this particular machine isn’t quite as accommodating as yours-truly.

    One solution would be to dim the lights in the room, but that isn’t a realistic possibility at work, in a large room with cubicles. In digging around for a solution to the glossy screen problem, I did find a few solutions. One that does show some promise is sold by NuShield:

    NuShield AG™ Antiglare Screen Protector Film

    The harsh lighting in most office and industrial environments can make it almost impossible to do your job well when you have to rely on hard-to-read LCD screens. After a year in development, NuShield AG Antiglare Screen Protector Film will minimize annoying surface glare under bright lights indoors or in an office/industrial setting. The antiglare film also hides fingerprints and filters out 99% of UV light from reaching the screen or reflecting back to your eyes.

    NuShield films are non-adhesive, held in place by tabs that wedge between the edge of the screen and the case. I would imagine static and suction also help to keep it in place, but I do like the no-adhesive thing. NuShield makes films for all kinds of applications, mostly to improve the durability of flat panel screens on monitors, laptops and handhelds.

    There’s not much on their website that isn’t marketing material; I suppose it’s a little difficult to demonstrate the effectiveness of a product like this with just photos. But the film isn’t terribly expensive, so I just ordered one for the iMac ($35) and one for my PowerBook ($15) as well. They have a handy-dandy product selector that shows custom-cut film to fit most all of the Apple products with built-in screens, and lots of other manufacturers also. So I figured it’d be ok to spend the money to give it a whirl (especially when it’s not my money!) I’ll post an update once my order arrives and I have it installed.

    Another possibility is to use a hood over the monitor. There was a day when hoods were pretty much standard equipment on high-end CRT monitors, but it’s been years since I threw the last one out. They usually ended up stashed under a desk, collecting dust. Well, they’re still out there; Compushade makes a universal fit model, priced in the mid-$40 range, and Photodon makes a much nicer hood, custom-fit for the iMacs for about the same money. Another option is to go with some cardboard cut to fit and spray-painted flat black. We’ll see how the film works out, and decide whether to give the hood a try.

    Edit: Click here to go to the review I wrote for the NuShield film.

    Animusic Pipe Dreams

    Sunday, November 2nd, 2008

    Miss C. posted this video on her site over the weekend, referring to it as, “An oldie that never gets old”. Well, it may be old in Internet terms (2006) but I’d never seen it before, and it’s truly worth watching. And it turns out the animators — Animusic — has put out two videos with similar content. Too cool!

    Watching it, I can’t help but appreciate the time and thought that had to go into this piece… I’m sure the animators started with the music, and then worked backward to synchronize the balls striking the instruments, then figured out where the balls would go afterward. The timing, the creative use of percussion, the movement through the 3D space… Very, very cool. Had to be done in animation, cuz it would never, ever work in real life. You’d have extra noise from the balls rattling through the PVC and balls flying everywhere; no way could you aim balls coming out of a common tube to strike instruments in different locations. But I guess that’s where the name comes from!

    Never mind my geeking over the details; just enjoy!

    The Wireless Extension Cord

    Thursday, October 30th, 2008

    I was looking for a surge protector with an extra-long cord for a project at work, and bumped into this doozy at ThinkGeek; a wireless extension cord!

    With tongue planted firmly in cheek, they describe the gadget thusly:

    Just plug the Wireless Extension Cord (WEC) base unit into a standard wall outlet, and plug whatever you need into the satellite unit. The WEC uses microwaves in the 7.2GHz range, so it won’t interfere with wireless networks, Bluetooth components, etc. Now, all you need to do is adjust the antennae on the two units so they are aimed at each other. Turn everything on and you have the power! The distance the WEC units can broadcast differs from situation to situation (due to interference of such things as walls, power lines, and microwave ovens), but we’ve beamed power over 300 feet! The future is wireless – and the WEC’s are your ticket to the future.

    The best part is the Warning:

    Warning: Even though these microwaves are about as harmful as the leakage from an ordinary microwave oven (not much), do not put computers, televisions, other sensitive electrical equipment, food, liquids, paper, glass, flammable substances, magnets, or living things in between the base and satellite units. Just in case.

    If only…

    Windows Rant Of The Day — Finding A File Path

    Tuesday, September 30th, 2008

    Here’s one place where the Macintosh really, really shines compared to Windows…

    Let’s say you have a document open in Word or Excel or PowerPoint, on either platform. Like many users, you just fired up the app and opened it through the handy-dandy Recent Documents list, just like you’ve done daily since you originated that document a month or so ago. And like many users you have no clue where on your hard drive you saved that particular file. But now, Gertrude in the next cubicle, or Hector in the Mexico City office, needs a copy of that file… How do you figure out where to find it?

    On the Mac, just hold down the Command (Apple) key and click on the document title bar. A menu showing every step in the file path drops down. Pull down and click in any step in that menu, and you’re taken to that directory/folder. While it’s not exactly intuitive — you probably won’t find that trick in any of the Office apps’ menus — it’s easy as can be once you know it. Once you see the file, you can copy it to a flash drive, drag it to an email message, burn it to a CD, or whatever.

    If you’re on a PC, well, it’s a different story. Emailing the file is pretty straightforward; click on the Office Button (in Office 2007) then pull down to Send — Email. That still doesn’t tell you where you can find the file, but Microsoft dumbs down that process enough to make it work. But what if you really need to burn that file to a CD or copy it to a thumb drive… how do you track down the location of the file?

    Not sure if this is the best way, but after much digging around in the Office 2007 menus, what I found is that you can click on the Office Button (in Office 2007) then pull down to Prepare — Properties; that opens up a Document Properties bar just below The Ribbon, which includes a Location: field that shows the full file path for the file. From there you can select & copy the path, then paste it into an Explorer window. Yeah. That’s intuitive.

    These examples refer to the Microsoft Office suite in both the Mac OS and in Windows; the same trick works in all apps on the Mac because it’s part of the OS. In Windows… the same trick will likely take different steps in different apps. That’s just the way it works in Winders.

    And once again, the Mac OS smacks the snot out of Windows.

    My Moller AirCar — A Dream Realized, Sort Of…

    Friday, September 19th, 2008

    I can remember drooling over the Moller SkyCar since the first time I saw renderings of it on the pages of Popular Science or Popular Mechanics decades ago. The thought of being able to hop into a machine that would lift off from your own driveway and zip you to your destination at speeds around 300 mph, far above traffic… What a wonderful thing that would be! A vehicle that is able to perform like a high-performance airplane, but as easy to drive as a car.

    Yesterday evening I at long last took possession of a Moller M400 SkyCar. It’s true! You would think my joy would be complete, but given the fact that what I’ve got is only a toy…

    Yes, it’s just a HotWings diecast model of the SkyCar. Not very fulfilling, but still not a bad deal for $1.98 at Target!

    The dream that is the Moller SkyCar remains just that; a dream. Since the idea was first introduced, the SkyCar’s inventor, Paul Moller, has failed to deliver a single working prototype of the SkyCar. That combined with Moller’s readiness to accept deposits from hopeful SkyCar buyers has led to accusations that the whole thing is a scam. Moller seems to put out a press release and make a big splash every now & then, which some say coincided with a need to generate some cash or deflect heat he’s getting from investors or government regulators. Part of me believes that to be true, but the more likely case is that Paul Moller is simply trying very hard to make his dream come true — he just doesn’t have the where-with-all to make it happen. The really unfortunate part is that he’s spent somewhere in the neighborhood of $200 million in the process, much of that coming from those hopeful investors, who won’t likely live to see any fruit from their investment.

    The company is publicly traded, and while looking at their trading info I was surprised to see a recent Yahoo Finance story on Moller dated just a few days back; apparently the company is “in the process of completing its fourth M200 “Jetson” volantor airframe. It expects to complete forty of these fly-by-wire, multi-engine flying vehicles in 2009.” The M200 is vastly different from the M400 SkyCar; it more closely resembles a flying saucer, using multiple ducted fans around the single seat to provide lift and directional thrust vectoring. The M200G is limited to ground-effect flight at a mere 10 feet above the ground. (after a little more digging, the Yahoo story seems to be a rehash of a press release that got much broader coverage back in July. Nothing new.)

    The design of the SkyCar seems to have morphed a bit over the years; the rotating ducted fan nacelles on stubby wings you see on the early renderings and on the diecast toy seem have been replaced by what looks to be fixed nacelles with thrust vectoring vanes, no forward wing, and a much larger rear wing. Some images I’ve seen show the rear wing folding up and over the rear engines, probably so it can fit in a garage (suppressed chortle).

    The SkyCar always has been a really, really cool idea, but I’m afraid the technology to make it work just hasn’t arrived yet. Engines powerful enough to get a vehicle, passengers & payload off the ground are too heavy to make something like the SkyCar practical, and fuel will I won’t get to fully realize my dream, but maybe my kids, or their kids, will.

    Further Reading:
    Davis Wiki Moller Page
    Wikipedia M400 SkyCar Article
    Official Moller Website

    The Trials & Tribulations Of Building An E-Bike On The Cheap

    Sunday, June 15th, 2008

    Last fall I finally broke down and bought an electric conversion kit for my bike. Getting there was a long process because the CFO (aka: the Wife) wasn’t terribly excited about the idea, so funding for it was very spotty. A bonus at work finally provided the cash needed for the motor, and I was on my way.

    I had checked out lots of different hubs, including the GoHub that I wrote about a while back, and settled on a rear wheel hub motor manufactured & sold by Golden Motor.
    ebike_hub_sm.jpg

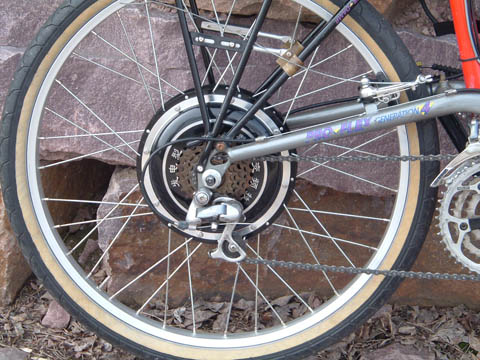
    In retrospect, the decision to go with the Golden hub was probably a poor one. The design of the motor itself is reportedly pretty decent, and my experience with it on the road is positive, but reports from users on their user’s forum show that the product quality from Golden is very inconsistent; most work well, but a sizable (and what most would consider unacceptable) percentage have serious issues, and service is about as bad as it gets. That means it’s nonexistent. Orders are handled by way of email and PayPal transactions, and the primary sales contact — Philip — is in China; messages to him go unanswered for way too long, if they get answered at all. About the only communication I received from him is when I actually placed an order for the motor; all the pre- and post-sales emails I’ve sent to him have been ignored. The best support for the product comes via the user’s forum, but that’s of pretty limited usefulness as there is absolutely no official presence there from Golden Motor. There are some knowledgeable, helpful individuals on the forum giving good information on occasion, but I’d much prefer someone on the inside keeping things humming.

    I picked the Golden Motor hub mainly because of price; $265 shipped — far less expensive than most others. When I first found them earlier last summer, the kit was $175 plus shipping, but with the weight of the kit, I’m sure shipping was fairly expensive; not $90 expensive, but… I really shouldn’t complain though. Now the price has jumped to $338 shipped. Guess the weak dollar has really taken its toll.

    After placing my order, I didn’t expect to see the hub for a while — reports on the forum pegged delivery to be measured in weeks — but it turned out that the longest delay was getting PayPal to transfer the cash to Golden. After they got my money the hub kit was shipped from a distributor in California (I think) and I got it within a few days. Apparently things are improving on that front.

    From what I read on the user’s forum, most hub motors sold are for front wheel installations. That kit seems to be well engineered and goes on the bike pretty easily. But the rear wheel kit… that’s pretty much a work in progress. I went with the rear hub thinking that it would give me the best flexibility for mounting it on other bikes, especially with the rowtrike/rowbike the boys and I are hoping to build in mind. After making that decision and placing my order, one issue that came to my attention is that the rear hubs required 160mm between the rear dropouts. I planed to mount the motor on my ProFlex mountain bike, which has a standard rear axle width of 135mm. If I did nothing to narrow the hub I’d need to spread the dropouts to add 25mm between the dropouts. That’s just under an inch, which may be a bit much. But when the motor arrived, the story was different.

    Others who had bough the rear hubs before reported that they had threads on both sides; the right side for the freewheel of course, and the left with matching threads for a brake. The hubs were originally designed for scooters in China, which use a band brake on the left side. Generally, band brakes are used on scooters and other small-wheeled contrivances; on a 26″ bike wheel, the torque is too much for the band brake to handle, and makes it pretty much worthless for stopping power. But the hub I received had threads only on the right side, for the freewheel. That made the width of the hub less of an issue, but I had a few other issues that I still needed to deal with.

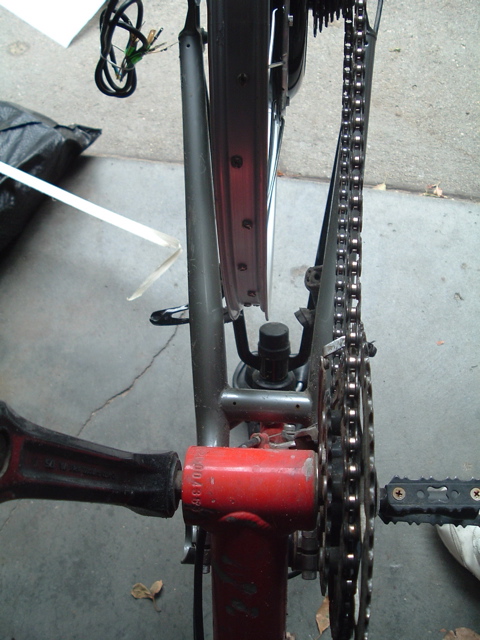
    The first order of business was to fabricate a new set of spacers for the axle that left enough room on the right for the freewheel. The spacers are short bits of steel tubing that fit between the bearing races and the bike frame dropouts. My motor appears to be one of the transitional iterations that was only half done right, and the spacers that were included were far too short to be of any use. I first measured the width of the hub, from the outsides of the two bearings and subtracted that from the space between the dropouts. I measured the depth of the freewheel and added a bit to that for the right side spacer, then used the remainder of the room available for the left.

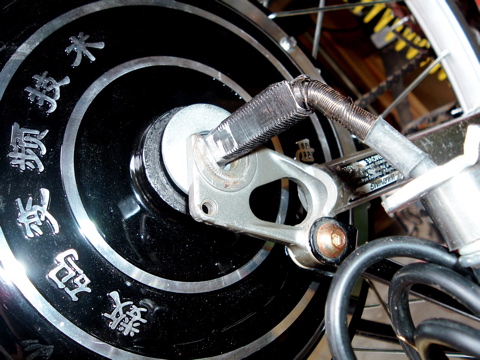
    Problem number two was with the axle. The axle has flats ground on them which holds the axle in place and allows the torque to be transferred to the ground instead of spinning the axle inside the hub. The axle flats were cut as if this hub still had the threaded cover on the left side — transitional species again. So I had to grind down the round part of the axle to extend the flats to where the dropout would hit it. You can see in the photo that even then, the threads don’t go far enough toward the center of the wheel, so I have to add a washer outside the dropout to keep the wheel on.

    axle_left_side.jpg

    The problem I then encountered was the rim; the wheel was built with the rim centered on the hub, so with the freewheel on the right, the hub — and the rim — was off center by about an inch.

    off-center.jpg

    I took the wheel to Spoke n Sport to have them dish it; I don’t have a truing stand, and I’ve only built two wheels in my entire life, so I thought they could do it much better than I. Turned out they could only move the rim about 5mm toward the freewheel side because the spokes on the other side were running out of threads. Dang. Not sure if buying longer spoke nipples is an option or what, but it’s still not where I need it. I went ahead and mounted the wheel on the bike, then adjusted the brakes to get them to work. It works, but I don’t much like the arrangement and will be swapping in a different rim properly dished sometime soon.

    ebike_sm.jpg

    One option that I had thought of earlier, but may end up just doing is to build a new rear triangle for the ProFlex specifically for the electric hub; one that pushes the wheel backward six inches or so to make room for batteries between the wheel and downtube, similar to the rear triangle on the Liberty Electric Bike. That idea comes in part from the XtraCycle FreeRadical and the Stoke Monkey; in fact a home-built version of that made from the rear triangle of a scrapped frame might be just the ticket. Hmmm… That’s got possibilities. I’ve been trying to scrounge up some old bike frames for the job, but most everything is just junk bikes, so I may have to get a little more sophisticated than Freecycle or thrift stores. Mainly what I’m looking for is a dropout that has a real derailleur hanger on it; I would think that something like that would be easier to come by, but…

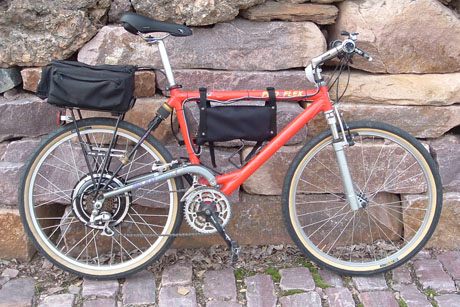
    My bike is a ProFlex 872, and the rear triangle is composed of a pair of beefy chainstays on a pivot just above the crank, with a smaller diameter set of seat stays attached to an elastomer shock just below the intersection of the seatpost and top tube. If I build a new rear triangle to supplant the original to make space behind the seat tube for mounting batteries down low, it will also make room for a real shock absorber for the rear wheel. The funky elastomer shocks on ProFlex bikes never lasted long, and with the demise of the manufacturer, replacement elastomers are hard to find — mine is long gone, replaced with a chunk of rubber designed for an automotive application, so it doesn’t have much give. It would be really nice to have a real shock in there!

    I ordered a set of three 12 volt, 7 amp/hour sealed lead acid batteries from Rage Battery for it, again being budget conscious in that decision. I put the batteries in an old trunk pack that on hand, setting that on an aluminum rack on the back of the bike. The controller was mounted to a small piece of plywood cut to fit inside a nylon bag that hangs from the top tube. Maybe when I get around to building the new rear triangle I’ll include room for the controller in there as well. The bag works ok, but it could be much better. Some of the other bikes built by Golden Motor buyers have some goofy looking controller installations, and I think mine is a bit cleaner looking. I might be compromising airflow around the controller a bit, but I don’t think heat has been much of an issue thus far.

    The biggest problem in using the bike so far this year has been the weather. We’ve had an unusually long, cold & wet spring. Mechanically, the bike has worked well for the first 100 miles. I have been able to use the bike to get to work and back with little effort… Riding the bike is like, well, riding a bike. Except riding with the motor feels like you’re always going downhill. Without pedaling the bike will carry me at a pretty steady 18mph. If I pedal a bit it’s possible to kick it up to about 25mph, but the biggest restriction there seems to be gearing — I can’t spin much faster than that. I’m thinking about putting a bigger chainring on it to increase my top speed.

    On the subject of gearing, another modification I’m considering is eliminating the multi-speed rear cluster. I’ve got a bit of a Mickey Mouse shifter arrangement set up for the rear derailleur — and old thumb shifter mounted on the left handlebar — and the result is that I don’t use it much. Most of the shifting is done on the front chainrings. A single speed freewheel on the wheel will make centering the wheel much easier.

    One thing that makes riding this bike feel different than a standard bike is out of the seat pedaling. Definitely not recommended. I did that riding up a steep hill last week, and I thought I was going to lose the batteries from the rack. Going up a hill does take a bit of effort; the motor alone isn’t up to the task. But even with a single speed freewheel, even a steep hill should be very doable by dropping down to a smaller chainring.

    When riding on the bike trail in Sioux Falls, it’s a kick being able to pass others so easily; makes you feel like Superman! I was riding it home one day last week, and there was a nasty crosswind. Other cyclists were struggling to keep going at about 10mph; I was able to maintain the usual 18-20mph with no trouble, so I flew by the others. So all in all, I think the project has been a success.

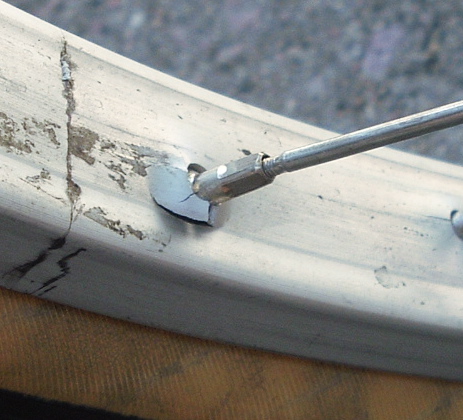
    Update: The bike worked great until this week. I hopped on it yesterday morning to go somewhere, and the rear wheel felt funny. I thought it might be low on air, so I turned around to fill it up. While attaching the pump I noticed a problem with one of the spokes…

    spoke_hole.jpg

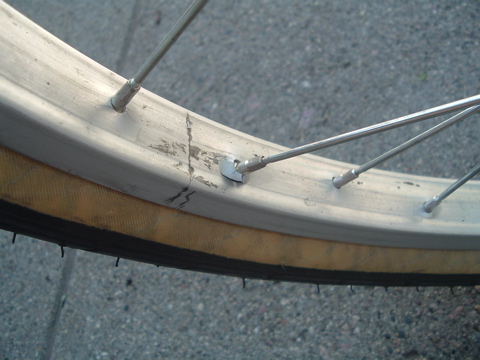
    It’s not supposed to look like that. Closer inspection showed that several other spoke holes showed less severe cracking; not a good sign, but not all that unexpected either. The rim that was included with the hub motor was a cheapo single-wall alloy rim, and obviously wasn’t designed for use on such a heavy bike. The motor, batteries, bike and me was a bit too much for it. This situation makes replacing the rim more than a someday thing. I hope to get the wheel dished properly this time; whether that involves buying different spokes or not, I don’t know.

    After removing the wheel for closer inspection, it also seems that the wheel doesn’t spin as easily as it did when I first got it. I’ll be removing the motor covers to inspect the bearings to see if there is a problem there. It appears that the wheel spacers have held up well; I was a little concerned about them. Even considering the initial challenges and this most recent setback, I still think the project has been successful. This issue with the rim will indeed be a challenge, but I think the end result will be a better performing product.

    The $13,000 Electric Bike

    Sunday, June 15th, 2008

    Wow! I bumped into this site a couple of days ago, and am just amazed… An electric motorized bicycle that costs more than some motorcycles. The Optibike probably represents the state-of-the-art in electric powered bikes, and is a very impressive piece of machinery, but hokey pete… $13,000? for a bicycle?

    ob1.jpg

    That price is the base price for their high-end model — the OB1 — which boasts an 850 watt motor, lithium ion battery, disk brakes, aluminum monocoque frame, carbon fiber wheels (and carbon fiber everything else it seems), full suspension wireless PDA interface for battery monitoring with built-in GPS(!)… The list goes on. The OB1 (wonder if the designer was a Star Wars fan) is pretty much custom built, and can be painted any way you like. Like I said, it’s their high-end model, and commands a high-end price.

    The OB1 is also designed to be able to go 57 miles on a charge, at speeds of 35mph and up, so the high end is impressive. What amazes me is that they are able to package it all in such a svelte frame; no bulky batteries hanging off in odd places, no bulky hub motor making it look out of place… It just looks like a bike. At least until it passes an Olympic-level cyclist like he’s standing still, and the rider isn’t even pedaling.

    The lineup also includes three other models; the 800Li, the 600Li, and the 400, priced at $8,995, $7,995, & $4,995 respectively. The models differ in the power output of the motors and the level of componentry hanging on the common frame. All of the Optibike models have in common the Motorized Bottom Bracket (MBB), a patented mechanism that combines a geared motor with the bike’s bottom bracket. Unfortunately, there isn’t much information on the site about how the MBB works.

    Very cool gear. Spendy, but very cool.

    The Virtual KVM

    Wednesday, April 23rd, 2008

    These days at work I’m supporting both Macs and PC’s. With recent change in my job responsibilities, the PC side is eclipsing the Mac somewhat (and no, I’m not liking it so much!) I finally broke down this month and purchased a real live modern Windows XP machine to go on my desk (which replaced a dog-slow 1.5GHz P4 machine). It’s a nice Lenovo ThinkCentre AMD-powered machine that I got off the clearance rack at a great price through CDW. I loaded it up with lots of RAM, a big hard drive, a DVD/CD writer, and it’s almost a pleasure to work on. Almost. But I’m neither ready nor willing to give up my PowerBook, and thankfully, since I am still responsible for the Mac end of things, I keep it.

    I already had a nice 22″ flat panel Samsung monitor that I’d hook up to the PowerBook while at work, and thought it could work for both machines with a USB KVM switch between the three devices, but had some difficulty getting the Belkin unit I have on hand to work. So I went shopping online for a replacement, with DVI connectors instead of the VGA on mine. But then I happened across a neat piece of software that works so slick, I dropped those plans altogether…

    It’s called Synergy, which is an Open Source utility which allows you to set up two or more computers — each with it’s own monitor — and use one keyboard & mouse to control all of them. (So I guess my title on this post is a little off, since it’s more of a Virtual KM switch, but oh well!)

    quicksynergy_icon.jpg

    On my desk, the Windows machine acts as the “server” portion of my setup — because the keyboard & mouse are plugged into it — and the PowerBook, being a portable, acts as the client. The setup instructions were a little obscure; definitely not written for the Mac “fire it up and it just works” crowd, but I got it configured ok on the windows side. The Mac side of the software downloaded from the Synergy SourceForge page was totally baffling, so to Google I went for help. What I found is that I wasn’t alone in having trouble getting it to work, but thankfully some kind soul put a GUI on the Open Source code and made it Mac-easy. Downloaded QuickSynergy, draged it to the Applications folder, fired it up, entered the server’s IP address in the Client tab and hit Start; that’s it.

    So now I’ve got the Lenovo box hooked up to the keyboard, monitor & mouse, and the PowerBook on a stand right next to the monitor. I move the cursor to the right side of the monitor and it hops over to the PowerBook, just as if the PowerBook’s screen is an extended desktop on the PC, and like the mouse is connected directly to the PowerBook. And when I need a larger screen on the Mac, I push the mouse over to the Mac side, plug the DVI cable into the side of the PowerBook, and press the input switch on the monitor (the PC uses the VGA input.) Extended desktop on the Mac, controlled via the keyboard & mouse on the PC. Several people at work think it’s magic; I almost have to agree with them.

    work_desk.jpg

    Yes, the Apple BlueTooth keyboard is still sitting there, only because it hasn’t found a new home yet, but it did come in handy while getting things set up. You’ll notice the Logitech TrackMan Wheel on the keyboard drawer; one of the best input devices ever. My hand rests on top of it, my thumb rolls the ball to move the cursor, and I get no wrist pain. Unless of course I end up working on someone else’s machine for an extended time.

    Even though the keyboard is Windows-centric, I have no trouble with on the Mac side. The Alt key acts as the Apple key, and the Windows key acts as the Option key. No muss, no fuss. However, I do have trouble remembering which keyboard command to use depending on which machine is being controlled at a given time; most keyboard shortcuts on the Mac involve using the Apple (Command) key, but in Windows it’s Ctrl. Copy on the Mac is Apple-C (or rather Alt-C on the physical keyboard), but Ctrl-C on the Windows side. Ditto with Paste, Undo, Cut, etc… Not a huge issue, but it really drives me nuts some days!

    In the photo you also see the Windows Server 2003 screensaver, which is running inside a VMWare console in the foreground on the main monitor; what a cool app that is, and for free even. VMWare lets you run a virtual machine inside a machine — I’ve been using it test on an upgrade to our print management database system (looking forward to that like a root canal) — in much the same way that Virtual PC allowed you to emulate a PC inside a Mac in years past. And at that price it can’t be beat. Another neat thing is that the VMWare site has a huge library of virtual appliances that you can download (either for free or for a price, depending on the device). The virtual appliances are all preconfigured, along with the properly configured OS, and will do any number of chores for you on a network. It’s too amazing for a sidebar here, so I may have to write about that later.