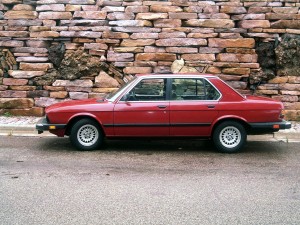
This is the third and maybe final installment in my Cheapskate’s Paint Job series (click here for Part 1, and here for Part 2.) One thing is for sure; the “$50 Paint Job” is a bit of a misnomer; it’s a paint job alright, but I’m pretty sure I passed the $50 mark not too long after buying the paint for it. I didn’t keep very close track of things, but when it was all said & done, the paint & materials for the job cost somewhere in the neighborhood of $200. Still far cheaper than a professional paint job, but $50 just wouldn’t cut it! So I’ll just call it The Cheapskate’s Paint Job®!
The car is nearly complete — only a few niggling details to button up — and I have to say I’m impressed with the results. I am by no means an autobody guy, but I do know a decent paint job when I see one, and this one shines like a professionally painted car. And that’s with no clearcoat and no wax on it. There are little issues galore with the paint job, most of them related to my crappy prep job (which is directly related to my crappy/nonexistent autobody skills), and my inexperience with the entire process, and my rush to finish it up in the last week or so.
But the final product proves to me at least that the concept and process is sound, and can yield a nice looking paint job for someone on a tight budget but has a good measure of patience and some spare time. Another thing I like about this process is that repairing scratches or dings or dents should be much less painful. One of the things that happened to me is that the mystery of auto finishing is gone; it’s no longer a black art in my mind. If something goes wrong with it, I know what went into getting it to look the way it does, and repairing it won’t be as monumental a task in my mind.
I can also say that the next time I take on a job like this, it’ll be killer. Will I take on another job like this? Mmmmm… Not in the foreseeable future, but if the need presents itself, and I don’t want to spend thousands of dollars on the car… And I have a better situation for garage space… And I have nothing better to do with a few weeks of my spare time… I might consider it. But not any time soon unless I want to be minus a wife!
The time involved was the biggest issue for me, but thankfully I had a spare car sitting in front of the house that I could use while the 528 was off the street. I don’t remember exactly what day I started this job, but I know it was around the beginning of July — about six weeks ago. It didn’t exactly take that long to complete, because there was a lot of downtime/thinking time/research time thrown in there, noodling out how to accomplish whatever the next step was. It’s definitely not a project to take on when you don’t have alternative transportation of some sort. If I were to do it again, I think I could be done — start to finish — in about a week. If I didn’t get sidetracked or distracted. As if that would ever happen.
The Rustoleum paint turned out pretty well, but one thing that might be an obstacle for some people is the limited number of colors, and the fact that there are no metallic colors; just solid colors. While I was painting I wondered whether this method would maybe work with standard automotive paints. I don’t foresee myself jumping into trying that any time soon, but I also don’t see why it wouldn’t work (as long as the paint doesn’t eat the foam on the roller.) Might be worth a try for someone who has a quart of automotive paint sitting around doing nothing. The Rustoleum is probably a lot cheaper than automotive paint, but I would hazard to guess that you’d use less by rolling it on vs. spraying.
After completing the job, if someone were to ask what is the secret to getting good results with this method, I’d have to list three things; prep, wet-sanding, and buffing. Skimp or screw up on any one of them and your final product will show it. (More on each of those topics at the end of this post.)
Make the jump to see a few photos of the car in process and as it stands today. You can’t really see the deficiencies in the paint, but if you saw it in person they’d be pretty apparent. It’s definitely about a “20 foot” paint job; looks great from a distance, but don’t look too closely. I’ve also added a checklist and step-by-step for the process with some hints from what I learned through the job. Hopefully someone can learn from some of my mistakes.
(more…)
