Last fall I finally broke down and bought an electric conversion kit for my bike. Getting there was a long process because the CFO (aka: the Wife) wasn’t terribly excited about the idea, so funding for it was very spotty. A bonus at work finally provided the cash needed for the motor, and I was on my way.
I had checked out lots of different hubs, including the GoHub that I wrote about a while back, and settled on a rear wheel hub motor manufactured & sold by Golden Motor.
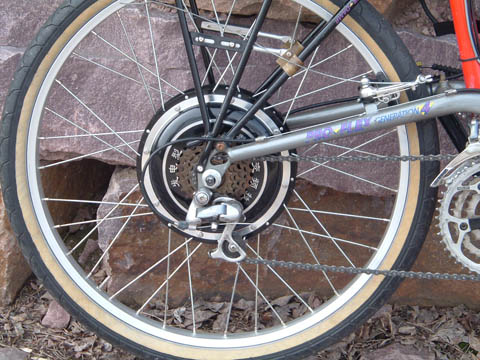
In retrospect, the decision to go with the Golden hub was probably a poor one. The design of the motor itself is reportedly pretty decent, and my experience with it on the road is positive, but reports from users on their user’s forum show that the product quality from Golden is very inconsistent; most work well, but a sizable (and what most would consider unacceptable) percentage have serious issues, and service is about as bad as it gets. That means it’s nonexistent. Orders are handled by way of email and PayPal transactions, and the primary sales contact — Philip — is in China; messages to him go unanswered for way too long, if they get answered at all. About the only communication I received from him is when I actually placed an order for the motor; all the pre- and post-sales emails I’ve sent to him have been ignored. The best support for the product comes via the user’s forum, but that’s of pretty limited usefulness as there is absolutely no official presence there from Golden Motor. There are some knowledgeable, helpful individuals on the forum giving good information on occasion, but I’d much prefer someone on the inside keeping things humming.
I picked the Golden Motor hub mainly because of price; $265 shipped — far less expensive than most others. When I first found them earlier last summer, the kit was $175 plus shipping, but with the weight of the kit, I’m sure shipping was fairly expensive; not $90 expensive, but… I really shouldn’t complain though. Now the price has jumped to $338 shipped. Guess the weak dollar has really taken its toll.
After placing my order, I didn’t expect to see the hub for a while — reports on the forum pegged delivery to be measured in weeks — but it turned out that the longest delay was getting PayPal to transfer the cash to Golden. After they got my money the hub kit was shipped from a distributor in California (I think) and I got it within a few days. Apparently things are improving on that front.
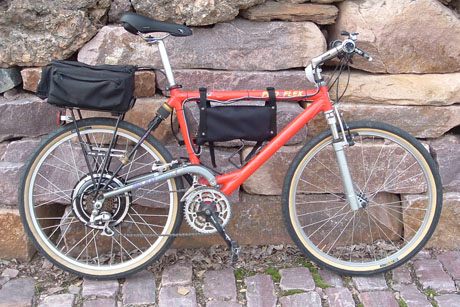
From what I read on the user’s forum, most hub motors sold are for front wheel installations. That kit seems to be well engineered and goes on the bike pretty easily. But the rear wheel kit… that’s pretty much a work in progress. I went with the rear hub thinking that it would give me the best flexibility for mounting it on other bikes, especially with the rowtrike/rowbike the boys and I are hoping to build in mind. After making that decision and placing my order, one issue that came to my attention is that the rear hubs required 160mm between the rear dropouts. I planed to mount the motor on my ProFlex mountain bike, which has a standard rear axle width of 135mm. If I did nothing to narrow the hub I’d need to spread the dropouts to add 25mm between the dropouts. That’s just under an inch, which may be a bit much. But when the motor arrived, the story was different.
Others who had bough the rear hubs before reported that they had threads on both sides; the right side for the freewheel of course, and the left with matching threads for a brake. The hubs were originally designed for scooters in China, which use a band brake on the left side. Generally, band brakes are used on scooters and other small-wheeled contrivances; on a 26″ bike wheel, the torque is too much for the band brake to handle, and makes it pretty much worthless for stopping power. But the hub I received had threads only on the right side, for the freewheel. That made the width of the hub less of an issue, but I had a few other issues that I still needed to deal with.
The first order of business was to fabricate a new set of spacers for the axle that left enough room on the right for the freewheel. The spacers are short bits of steel tubing that fit between the bearing races and the bike frame dropouts. My motor appears to be one of the transitional iterations that was only half done right, and the spacers that were included were far too short to be of any use. I first measured the width of the hub, from the outsides of the two bearings and subtracted that from the space between the dropouts. I measured the depth of the freewheel and added a bit to that for the right side spacer, then used the remainder of the room available for the left.
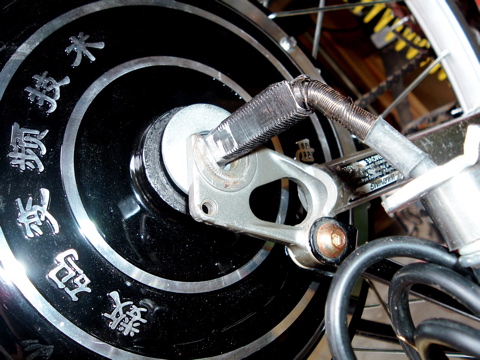
Problem number two was with the axle. The axle has flats ground on them which holds the axle in place and allows the torque to be transferred to the ground instead of spinning the axle inside the hub. The axle flats were cut as if this hub still had the threaded cover on the left side — transitional species again. So I had to grind down the round part of the axle to extend the flats to where the dropout would hit it. You can see in the photo that even then, the threads don’t go far enough toward the center of the wheel, so I have to add a washer outside the dropout to keep the wheel on.
The problem I then encountered was the rim; the wheel was built with the rim centered on the hub, so with the freewheel on the right, the hub — and the rim — was off center by about an inch.
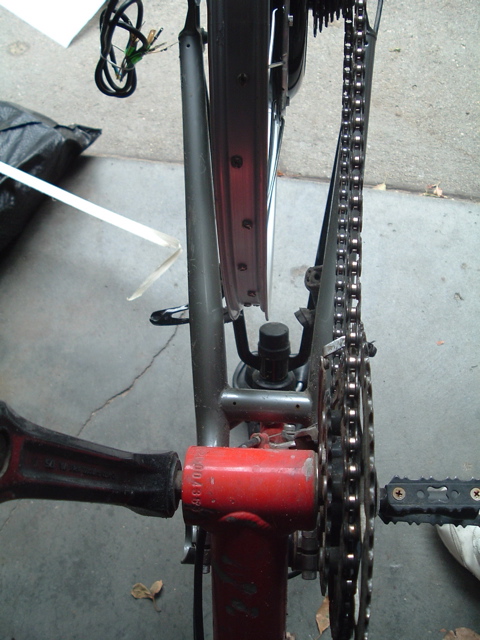
I took the wheel to Spoke n Sport to have them dish it; I don’t have a truing stand, and I’ve only built two wheels in my entire life, so I thought they could do it much better than I. Turned out they could only move the rim about 5mm toward the freewheel side because the spokes on the other side were running out of threads. Dang. Not sure if buying longer spoke nipples is an option or what, but it’s still not where I need it. I went ahead and mounted the wheel on the bike, then adjusted the brakes to get them to work. It works, but I don’t much like the arrangement and will be swapping in a different rim properly dished sometime soon.
One option that I had thought of earlier, but may end up just doing is to build a new rear triangle for the ProFlex specifically for the electric hub; one that pushes the wheel backward six inches or so to make room for batteries between the wheel and downtube, similar to the rear triangle on the Liberty Electric Bike. That idea comes in part from the XtraCycle FreeRadical and the Stoke Monkey; in fact a home-built version of that made from the rear triangle of a scrapped frame might be just the ticket. Hmmm… That’s got possibilities. I’ve been trying to scrounge up some old bike frames for the job, but most everything is just junk bikes, so I may have to get a little more sophisticated than Freecycle or thrift stores. Mainly what I’m looking for is a dropout that has a real derailleur hanger on it; I would think that something like that would be easier to come by, but…
My bike is a ProFlex 872, and the rear triangle is composed of a pair of beefy chainstays on a pivot just above the crank, with a smaller diameter set of seat stays attached to an elastomer shock just below the intersection of the seatpost and top tube. If I build a new rear triangle to supplant the original to make space behind the seat tube for mounting batteries down low, it will also make room for a real shock absorber for the rear wheel. The funky elastomer shocks on ProFlex bikes never lasted long, and with the demise of the manufacturer, replacement elastomers are hard to find — mine is long gone, replaced with a chunk of rubber designed for an automotive application, so it doesn’t have much give. It would be really nice to have a real shock in there!
I ordered a set of three 12 volt, 7 amp/hour sealed lead acid batteries from Rage Battery for it, again being budget conscious in that decision. I put the batteries in an old trunk pack that on hand, setting that on an aluminum rack on the back of the bike. The controller was mounted to a small piece of plywood cut to fit inside a nylon bag that hangs from the top tube. Maybe when I get around to building the new rear triangle I’ll include room for the controller in there as well. The bag works ok, but it could be much better. Some of the other bikes built by Golden Motor buyers have some goofy looking controller installations, and I think mine is a bit cleaner looking. I might be compromising airflow around the controller a bit, but I don’t think heat has been much of an issue thus far.
The biggest problem in using the bike so far this year has been the weather. We’ve had an unusually long, cold & wet spring. Mechanically, the bike has worked well for the first 100 miles. I have been able to use the bike to get to work and back with little effort… Riding the bike is like, well, riding a bike. Except riding with the motor feels like you’re always going downhill. Without pedaling the bike will carry me at a pretty steady 18mph. If I pedal a bit it’s possible to kick it up to about 25mph, but the biggest restriction there seems to be gearing — I can’t spin much faster than that. I’m thinking about putting a bigger chainring on it to increase my top speed.
On the subject of gearing, another modification I’m considering is eliminating the multi-speed rear cluster. I’ve got a bit of a Mickey Mouse shifter arrangement set up for the rear derailleur — and old thumb shifter mounted on the left handlebar — and the result is that I don’t use it much. Most of the shifting is done on the front chainrings. A single speed freewheel on the wheel will make centering the wheel much easier.
One thing that makes riding this bike feel different than a standard bike is out of the seat pedaling. Definitely not recommended. I did that riding up a steep hill last week, and I thought I was going to lose the batteries from the rack. Going up a hill does take a bit of effort; the motor alone isn’t up to the task. But even with a single speed freewheel, even a steep hill should be very doable by dropping down to a smaller chainring.
When riding on the bike trail in Sioux Falls, it’s a kick being able to pass others so easily; makes you feel like Superman! I was riding it home one day last week, and there was a nasty crosswind. Other cyclists were struggling to keep going at about 10mph; I was able to maintain the usual 18-20mph with no trouble, so I flew by the others. So all in all, I think the project has been a success.
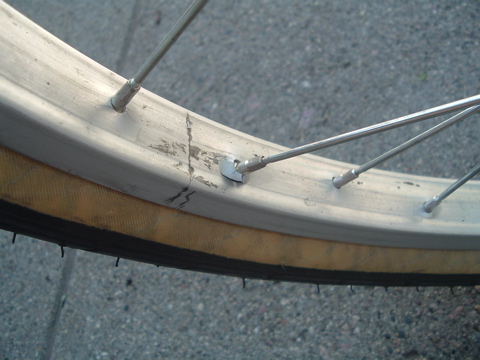
Update: The bike worked great until this week. I hopped on it yesterday morning to go somewhere, and the rear wheel felt funny. I thought it might be low on air, so I turned around to fill it up. While attaching the pump I noticed a problem with one of the spokes…
It’s not supposed to look like that. Closer inspection showed that several other spoke holes showed less severe cracking; not a good sign, but not all that unexpected either. The rim that was included with the hub motor was a cheapo single-wall alloy rim, and obviously wasn’t designed for use on such a heavy bike. The motor, batteries, bike and me was a bit too much for it. This situation makes replacing the rim more than a someday thing. I hope to get the wheel dished properly this time; whether that involves buying different spokes or not, I don’t know.
After removing the wheel for closer inspection, it also seems that the wheel doesn’t spin as easily as it did when I first got it. I’ll be removing the motor covers to inspect the bearings to see if there is a problem there. It appears that the wheel spacers have held up well; I was a little concerned about them. Even considering the initial challenges and this most recent setback, I still think the project has been successful. This issue with the rim will indeed be a challenge, but I think the end result will be a better performing product.
